Cisco Webex Teams
The Cisco Webex Teams integrationIntegrations connect and integrate Home Assistant with your devices, services, and more. [Learn more] allows you to deliver rich notifications from Home Assistant to Cisco Webex
To use this notification platform you will need an app (bot) token. To obtain a token visit Cisco Webex for Developers
- Detailed instructions can be found in the section titled Creating a Webex Bot on the Webex Teams bot documentation
.
You also need to specify the room_id that you wish to post messages into. The room_id can be found in one of three ways:
- Logging in at Cisco Webex for Developers
and navigate to Documentation>Webex Messaging>All APIs>Messagesand select List Messages. - Log into the web client at web.webex.com
, - select the room (or create a new room),
- then copying the room ID from the URL.
- Within the Webex Client, press Control+Shift+K (Windows) or Command+Shift+K (macOS), which will automatically copy the space information to your clipboard, which you can paste to a notepad, and will contain your space ID.
You must add the bot email (in the format mybot@webex.bot) as a participant to the room specified above.
To enable this platform in your installation, add the following to your configuration.yamlThe configuration.yaml file is the main configuration file for Home Assistant. It lists the integrations to be loaded and their specific configurations. In some cases, the configuration needs to be edited manually directly in the configuration.yaml file. Most integrations can be configured in the UI. [Learn more] file.
After changing the configuration.yamlThe configuration.yaml file is the main configuration file for Home Assistant. It lists the integrations to be loaded and their specific configurations. In some cases, the configuration needs to be edited manually directly in the configuration.yaml file. Most integrations can be configured in the UI. [Learn more] file, restart Home Assistant to apply the changes. The integration is now shown on the integrations page under Settings > Devices & services. Its entities are listed on the integration card itself and on the Entities tab.
# Example configuration.yaml entry
notify:
  - name: NOTIFIER_NAME
    platform: cisco_webex_teams
    token: YOUR_BOT_TOKEN
    room_id: CISCO_WEBEX_TEAMS_ROOMID
Rich Text Formatting
Webex clients can render rich text via a whitelisted set of html tags.
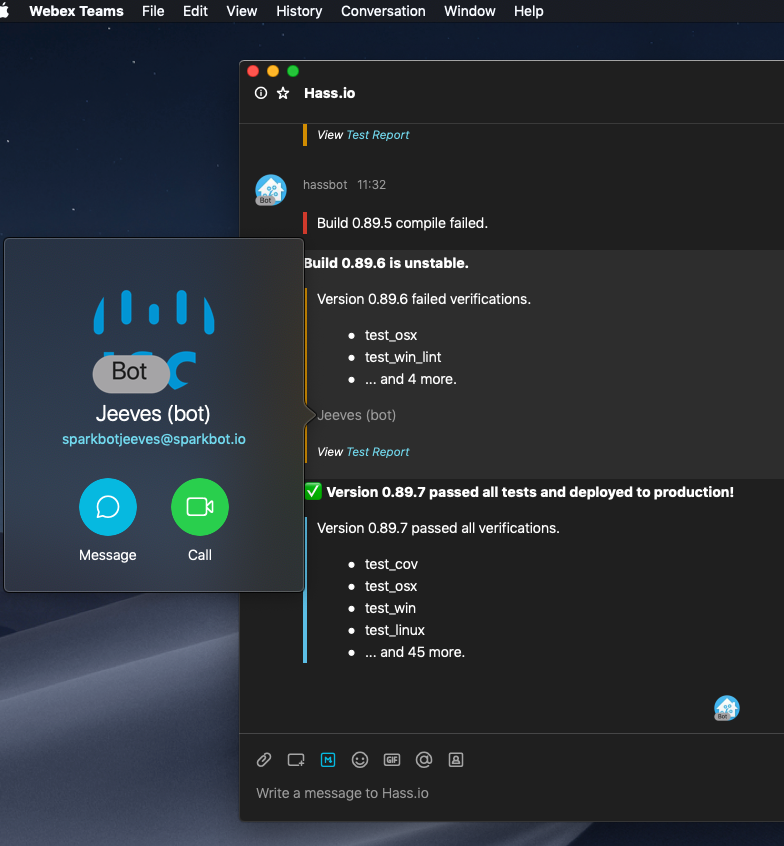
For example, you could configure automations to display details in an easy to read fashion like so:
 Rich text as displayed in the macOS client.
Here are the automations for the above screenshot:
# Rich Text Example 1.
# Show a one line message with a red banner
- alias: "Notify On Build Failing"
  triggers:
    - trigger: webhook
      webhook_id: build_failed
  actions:
    - action: notify.cisco_webex_teams_notify
      data:
        message: "<blockquote class=danger>Build 0.89.5 compile failed."


# Rich Text Example 2.
# Show a title and multi-line message with a yellow banner,
# with lists, a person mention and a link
- alias: "Notify On Build Unstable"
  triggers:
    - trigger: webhook
      webhook_id: build_unstable
  actions:
    - action: notify.cisco_webex_teams_notify
      data:
        title: "<strong>Build 0.89.6 is unstable.</strong>"
        message: "<blockquote class=warning>Version 0.89.6 failed verifications.

        <ul>
          <li> test_osx
          <li> test_win_lint

          <li>... and 4 more.
        </ul>
        <p><@personEmail:sparkbotjeeves@sparkbot.io></p>
        <p><small><i>View <a href='https://demo/testReport/'>Test Report</a></i></small><br></p>
        "

# Rich Text Example 3.
# Show a title and multi-line message with a blue banner,
# with lists, a person mention and a link
- alias: "Notify On Build Passing"
  triggers:
    - trigger: webhook
      webhook_id: build_passed
  actions:
    - action: notify.cisco_webex_teams_notify
      data:
        title: "<strong>✅ Version 0.89.7 passed all tests and deployed to production!</strong>"
        message: "<blockquote class=info>Version 0.89.7 passed all verifications.

        <ul>
          <li> test_cov
          <li> test_osx
          <li> test_win
          <li> test_linux
          <li>... and 45 more.
        </ul>
        "
The following is a list of the allowed html tags and attributes:
| Tag | More Info |
|---|---|
<@personEmail:email@examplecompany.com> |
Used to tag another Webex Team user by email address. |
<a> |
Defines a hyperlink. Allows attribute href. |
<blockquote> |
Defines a section that is quoted from another source. Allows attribute class with allowed values danger, warning, info, primary, secondary. |
<b> |
Defines bold text. |
<strong> |
Defines important text. |
<i> |
Defines italic text. |
<em> |
Defines emphasized text. |
<pre> |
Defines preformatted text. |
<code> |
Defines a piece of computer code. |
<br> |
Defines a single line break. |
<p> |
Defines a paragraph. |
<ul> |
Defines an unordered list. |
<ol> |
Defines an ordered list. |
<li> |
Defines a list item. |
<h1> to <h3>
|
Defines HTML headings. |
To use notifications, please see the getting started with automation page.