History
The History integrationIntegrations connect and integrate Home Assistant with your devices, services, and more. [Learn more] shows how the states of your entities changed over time, so you can browse through what happened in your home. It depends on the Recorder integration for storing the data and uses the same database. If an entity is excluded from the Recorder, no history is available for that entity.
Viewing history in the History panel
The History panel shows how the states of your entities changed over time. The panel stays empty until you select what you want to see.
- In the sidebar, select History.
- On a wide screen, the Sources pane opens on the left.
- On a narrow screen, such as a phone, select Sources
in the toolbar to open it.
- In the Sources pane, select Add target, then select the floors, areas, devices, entities, or labels you want to see.
- Optional: To narrow down your selection, use the filters below the targets:
- Type: shows only entities of the selected types. For example, select an area, then select the Temperature type under Sensor to see only the temperature sensors in that area.
- Integrations: shows only entities that are provided by the selected integrations.
- Home Assistant remembers your targets and filters the next time you open the panel. To remove all of them, select Clear filter
at the top of the pane.
- To change the time period, select the date range in the toolbar.
- To move to the previous or next period, select the arrows next to the date range.
Exporting data from the History panel
- Select the sources and the time period, as described in Viewing history in the History panel.
- In the top right corner, select Menu
, then select Download data. - Result: Your data is exported in CSV format.
Adding the current view to a dashboard
To keep the graph you are looking at on a dashboard, add it as a History graph card.
- Select the sources and the time period, as described in Viewing history in the History panel.
- In the top right corner, select Menu
, then select Add current view as card. - Select the dashboard and view to add the card to.
- Result: The card shows the selected entities and covers the same number of hours as your selected time period.
About the data sources
By default, the Recorder keeps the detailed history of your entities for 10 days. Older detailed data is purged automatically. Long-term statistics are not purged: they are kept indefinitely. The data for the last 10 days is taken from the detailed history.
If you select a time period that goes back further than 10 days, the older data is taken from the long-term statisticsHome Assistant keeps statistics for sensors that have a state class, such as measurement, total, or total increasing. Every 5 minutes, it saves short-term statistics, which are deleted after 10 days by default. Every hour, it saves long-term statistics, which are never deleted automatically. The Energy dashboard and statistics cards use them. [Learn more]. Long-term statistics are saved for sensors with a state class of measurement, total, or total_increasing. To save storage, long-term statistics only keep hourly values. For these hours, the History panel shows the hourly average of sensors with the measurement state class, and the reading at the end of each hour for sensors with the total or total_increasing state class. Therefore, the values might look different from what you see in the detailed history, which shows the measured values at the sample rate defined for that sensor. The detailed data will be shown with a darker line on graphs.
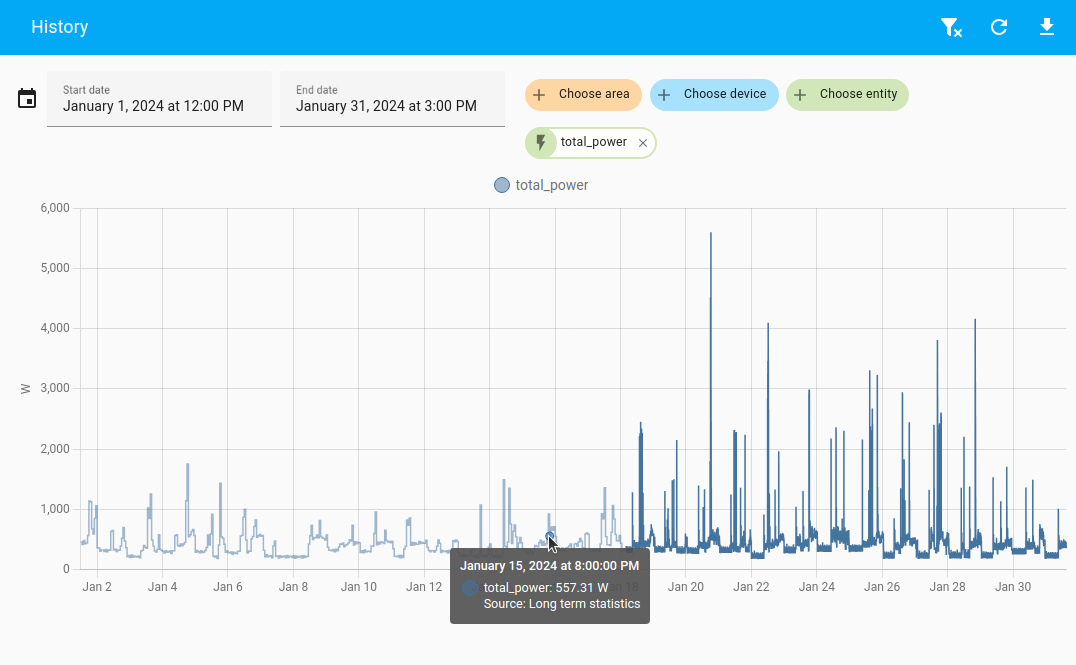
If you want to see the data in full resolution for a longer period of time, increase the purge_keep_days option of the Recorder. This option applies to the detailed history of all entities, not to a single sensor. If you increase it, you may need to increase the storage capacity of your device.
Configuration
This integration is enabled by default, unless you’ve disabled or removed the default_config: line from your configuration.yamlThe configuration.yaml file is the main configuration file for Home Assistant. It lists the integrations to be loaded and their specific configurations. In some cases, the configuration needs to be edited manually directly in the configuration.yaml file. Most integrations can be configured in the UI. [Learn more] file. If that is the case, the following example shows you how to enable this integration manually:
# Basic configuration.yaml entry
history:
API
The history information is also available through the RESTful API.