Husqvarna Automower
The Husqvarna Automower integrationIntegrations connect and integrate Home Assistant with your devices, services, and more. [Learn more] provides connectivity with Husqvarna Automowers lawn mowers through Husqvarna’s cloud API. Only mowers with Automower® Connect or with the Automower® Connect Module are supported.
In order to use this integration you must properly configure OAuth2 credentials using your Husqvarna account. Refer to this guide
-
Go to the Husqvarna Developer Portal
and sign in with your Husqvarna account. Authorize Developer Portal to access Husqvarna account when prompted. -
After signing in you will be automatically redirected to “My applications”. (Otherwise go to: Applications
) -
Create a new application:
-
Name is required but can be anything, for example “My Home Assistant”
-
Description is optional
-
Redirect URL:
https://my.home-assistant.io/redirect/oauthMake sure no extra spaces were appended at end of URL from copy and paste.
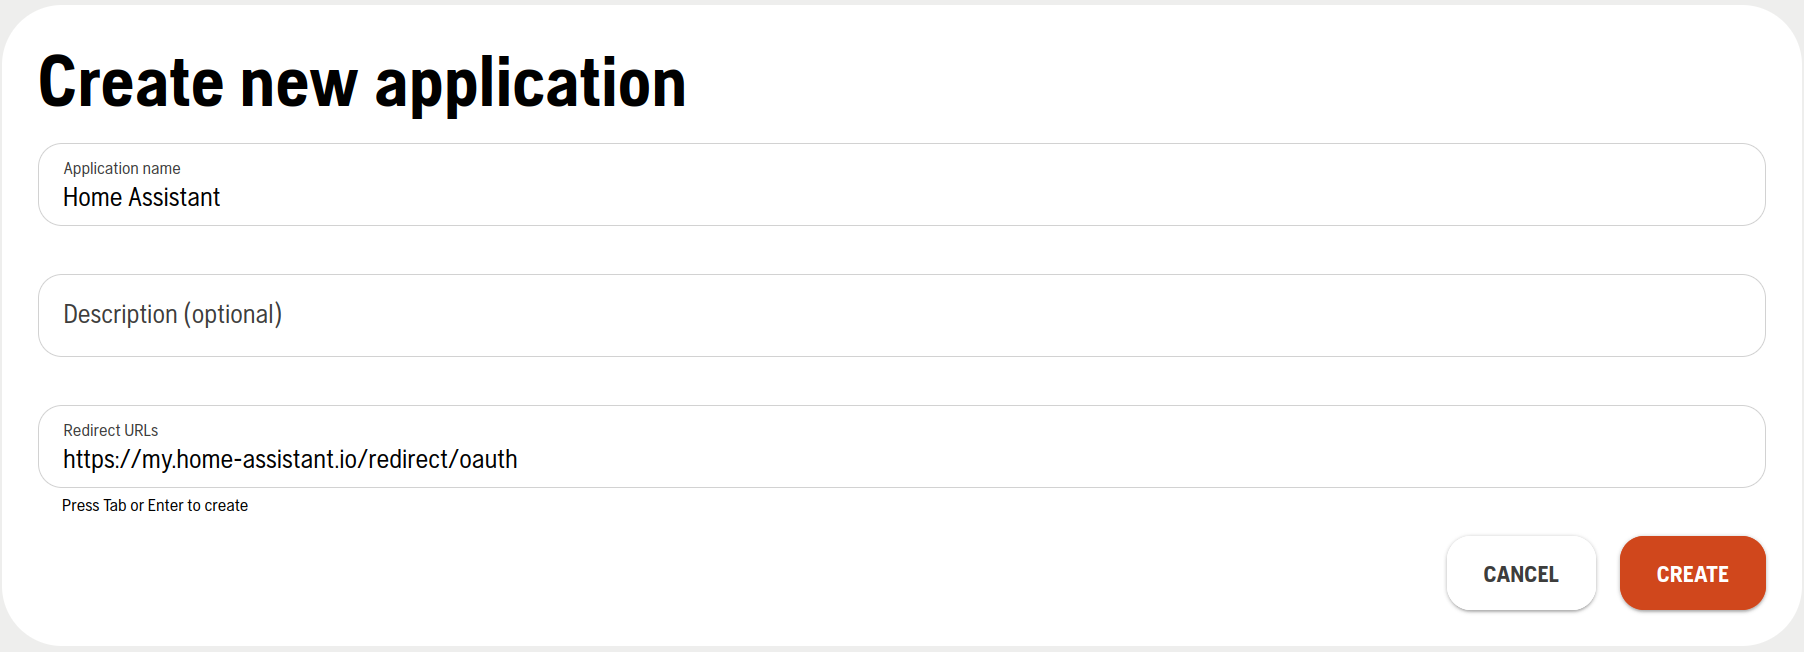
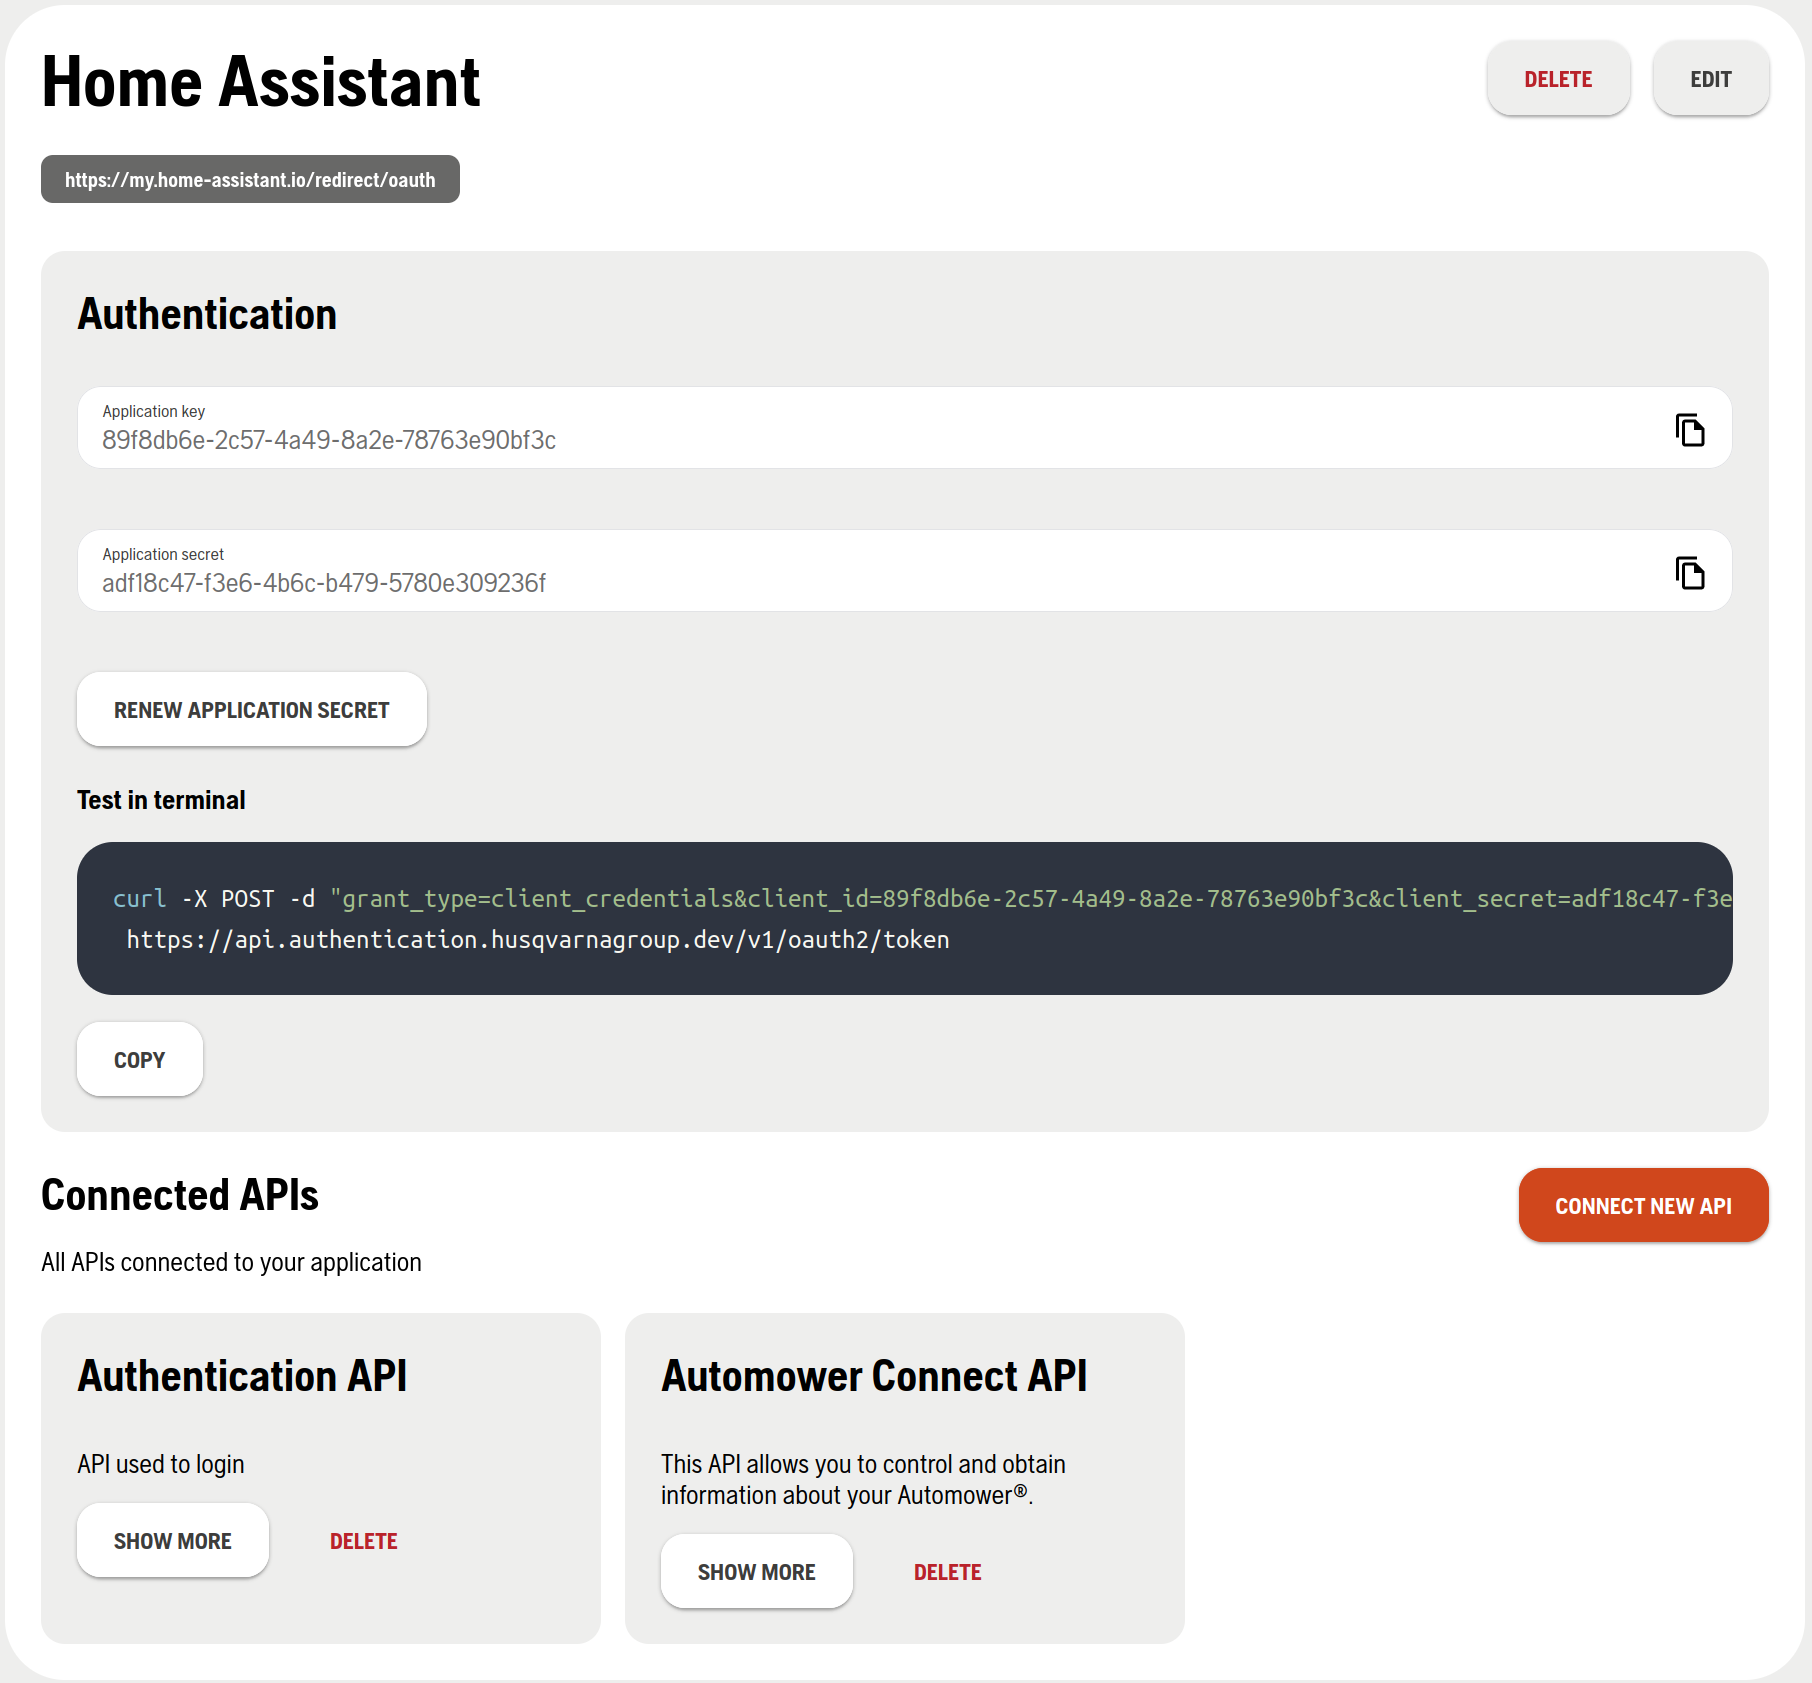
- Click CREATE. Application Key and Application Secret will be generated and shown. Protect these like a username and password.
-
-
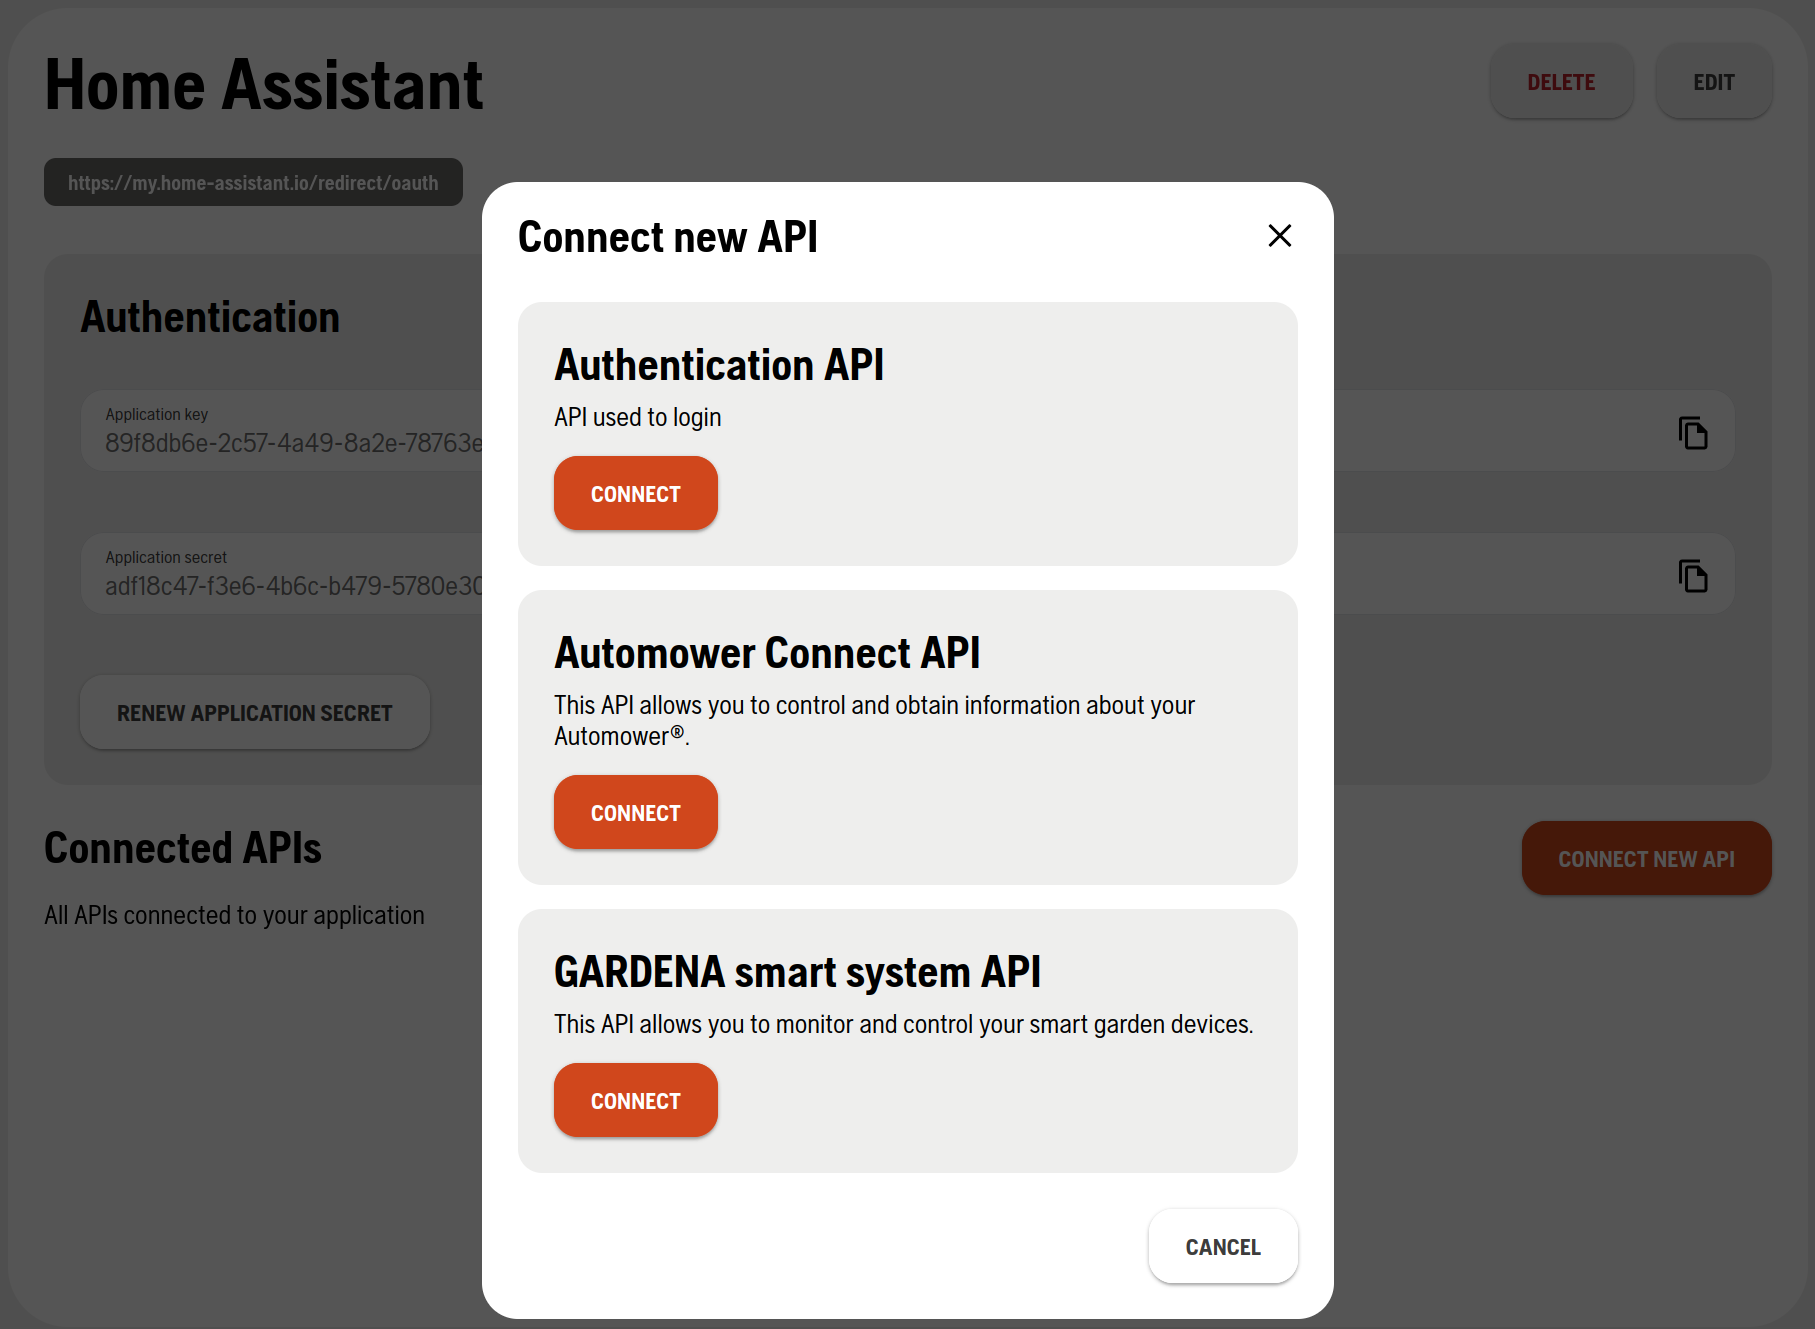
Click on CONNECT NEW API and connect the Authentication API.
-
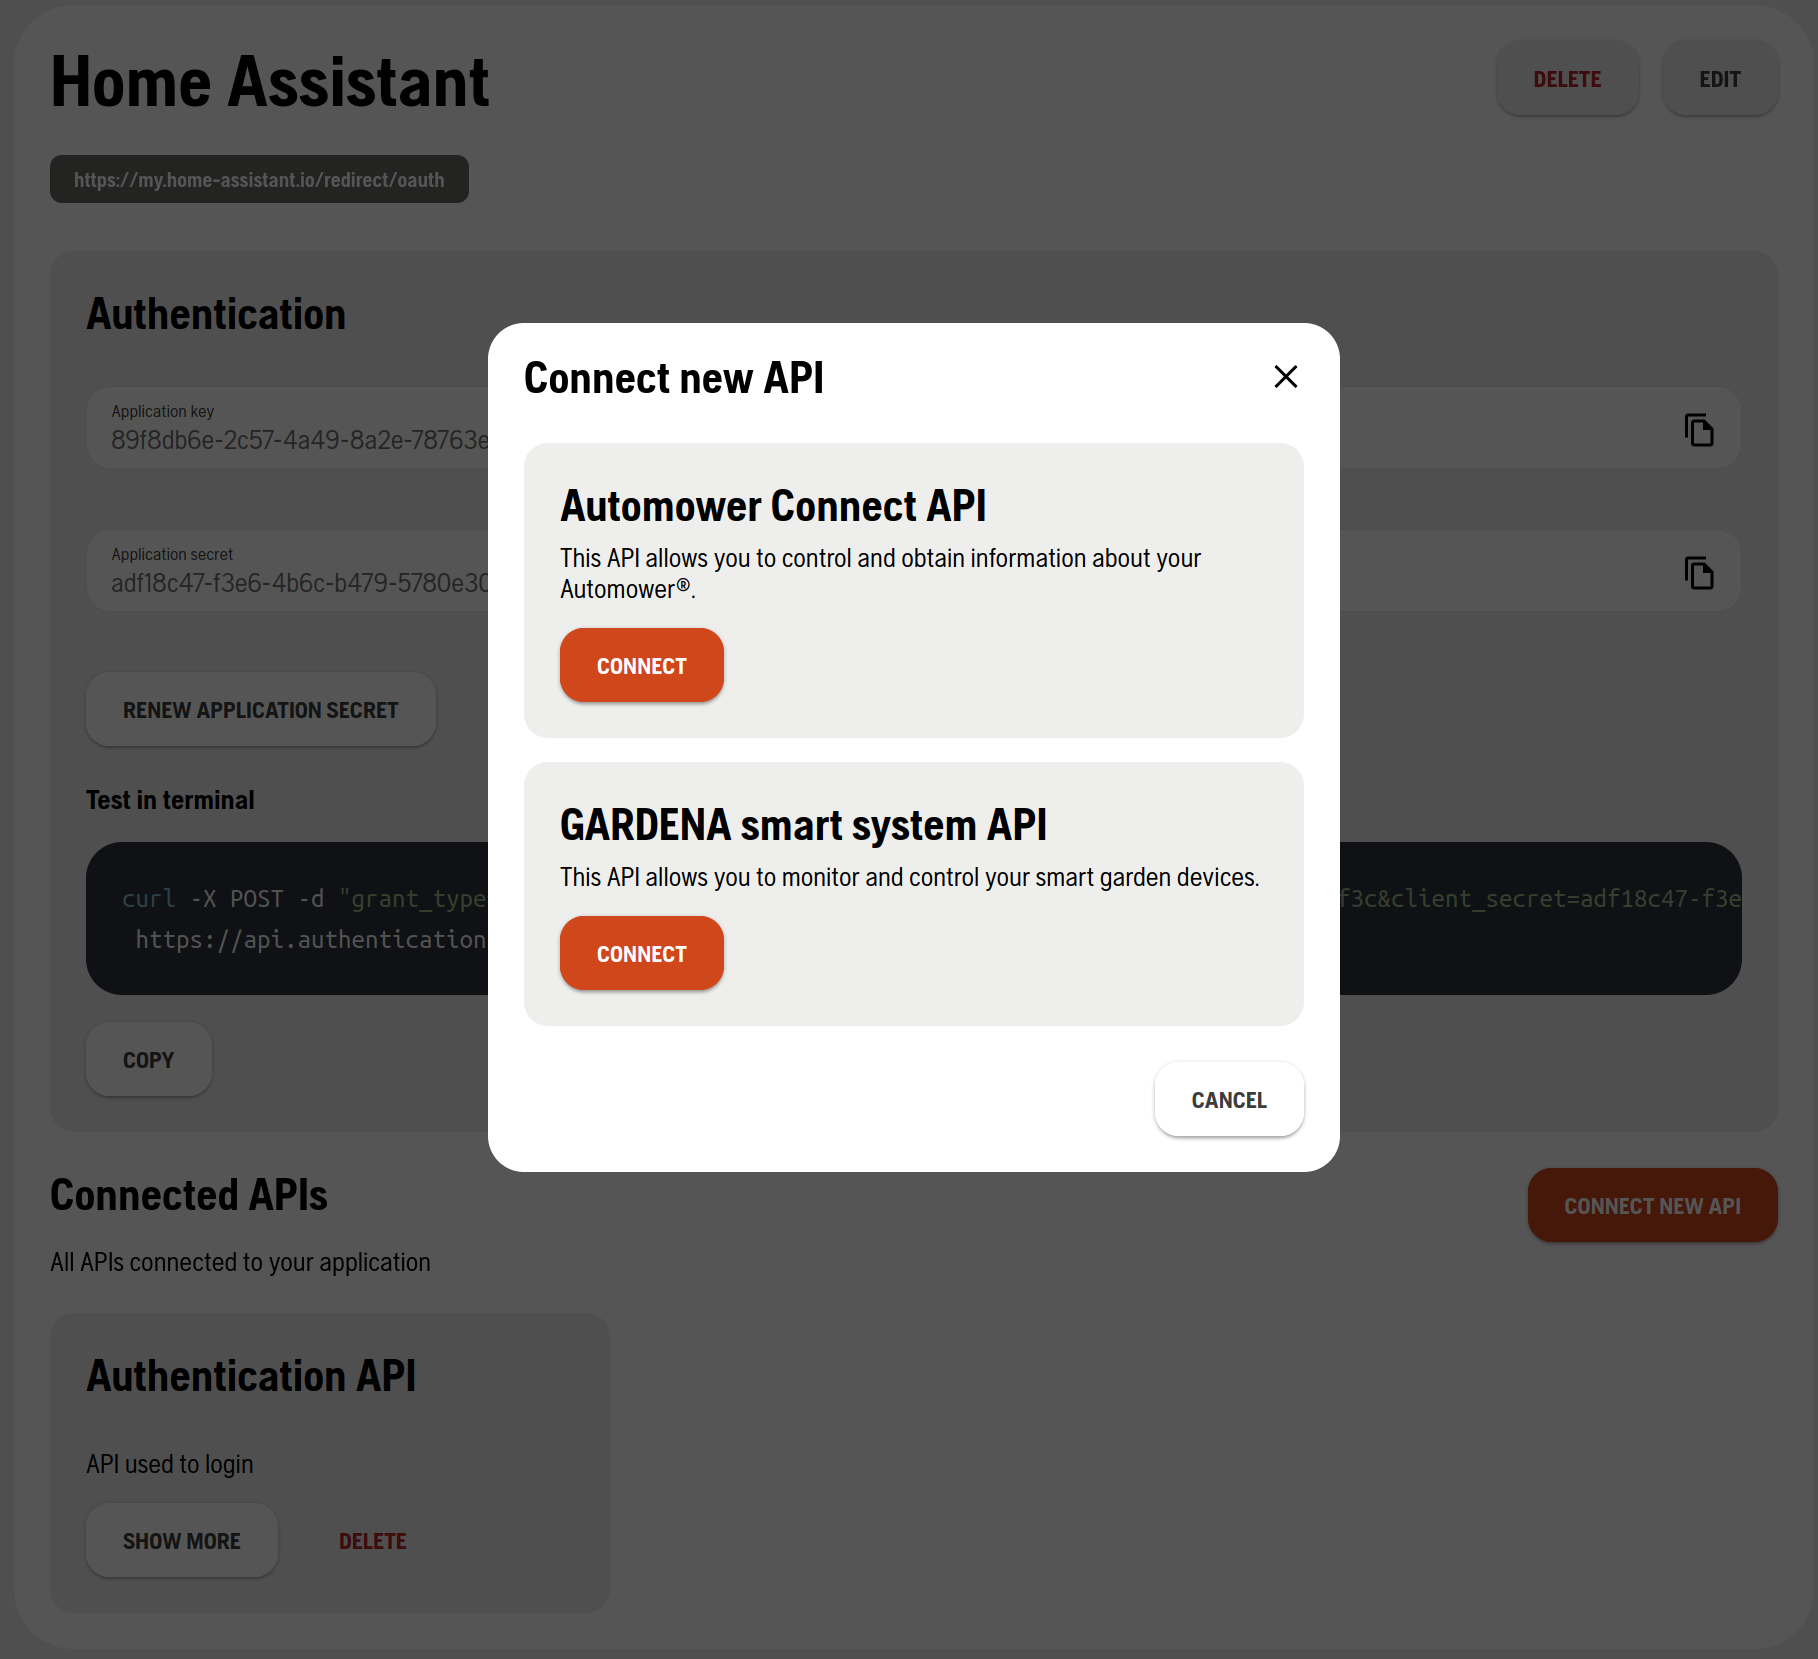
Click on CONNECT NEW API again and connect the Automower Connect API.
-
Leave this tab open in browser and continue with Home Assistant configuration.
Configuration
To add the Husqvarna Automower hub to your Home Assistant instance, use this My button:
If the above My button doesn’t work, you can also perform the following steps manually:
-
Browse to your Home Assistant instance.
-
In the bottom right corner, select the
Add Integration button. -
From the list, select Husqvarna Automower.
-
Follow the instructions on screen to complete the setup.
I have manually disabled My Home Assistant
If you don’t have My Home Assistant on your installation,
you can use <HOME_ASSISTANT_URL>/auth/external/callback as the redirect URI
instead.
The <HOME_ASSISTANT_URL> must be the same as used during the configuration/
authentication process.
Internal examples: http://192.168.0.2:8123/auth/external/callback, http://homeassistant.local:8123/auth/external/callback.”
Troubleshooting
If you have an error with your credentials, you can delete them on the application credentials page.
Entities
Once you have enabled the Husqvarna Automower integration, you should see the following entities:
Binary sensor
The integration will create the following binary sensors:
- Battery charging
The mower is currently charging. It reports this state if it autonomously returned to the dock due to low battery and if it leaves the dock for mowing after being fully charged. - Leaving dock
The mower is currently leaving the charging station and heading out to a starting point.
Button (if available)
The integration will create the following buttons:
- Confirm Error (if available): For confirming minor mower errors.
- Reset cutting blade usage time (if available): Resets the cutting blade usage time.
- Sync clock: Syncs the clock of the mower with the time set in Home Assistant.
Calendar
The integration will create a calendar entity for all mowers. The calendar shows all current and upcoming schedules.
Device tracker (if available)
The integration will create a device tracker entity to show the position of the mower.
Event (if available)
- Shows the last error as event.
- Includes additional context:
severity,latitude,longitude, anddate_time.
Example attributes
| Attribute | Description |
|---|---|
event_type |
Error code (for example, tilt_error) |
severity |
Error severity (for example, error, warning) |
latitude |
Latitude where the error occurred |
longitude |
Longitude where the error occurred |
date_time |
Timestamp of the error |
Use cases
- Send a notification when the mower is lifted or stuck.
- Show last error location on a map
The entity will only be created when a new message is received. If a mower hasn’t reported any errors yet, the entity won’t show up.
Lawn mower
The integration will create a lawn mower entity to control the mower. This entity can:
- Resume the schedule
- Pause mowing
- Park until next schedule
Number (if available)
Cutting height
The integration will create a number entity for changing the cutting height of the mower. This entity is disabled by default. You have to enable it manually. It can’t be detected with the API if the mower has the capability to change the cutting height remotely. Before enabling this function, refer to the mower documentation. Depending on the mower, it is possible that you can use this entity only passively as a sensor and not actively to change the cutting height. Possible values are 1 (grass stays short) to 9 (grass stays high).
Cutting height for work areas
The integration will create a number entity for changing the cutting height for each work area of the mower if your mower supports work areas. Possible values for the cutting heights are 0% (grass stays short) to 100% (grass stays high) of the default cutting height. Note: It’s not yet possible to change the default cutting height with Home Assistant.
Select (if available)
The integration will create a select entity for selecting the headlight mode of the mower.
Sensor
The integration will create the following sensors:
- Battery level
- Cutting blade usage time (if available)
- Error. For example: Mower tilted, outside geofence.
- Downtime (if available)
- Inactive reason (if available). For example: Searching for satellites or planning.
- Remaining charging time
- Restricted reason. For example: Week schedule, frost, or daily limit.
- Mode
- Next start
- Number of charging cycles
- Number of collisions
- Total charging time
- Total cutting time
- Total drive distance
- Total running time
- Total searching time
- Uptime (if available)
- Work area (if available). For example: My lawn, Front lawn, Back lawn
For each work area with activated systematic mowing these sensors are created:
- Progress (in percent)
- Last time completed
Switch
Avoid (if available)
The integration will create a switch for each stay-out zone defined for your mower. When the switch is on, the mower avoids the corresponding zone. When the switch is off, the mower enters the corresponding zone.
Enable schedule
The integration will create a switch to enable or disable the schedule of the mower. If the switch is on, the mower will mow according to the schedule. If the switch is off the mower will return to the dock and park until further notice.
Work area (if available)
The integration will create a switch for each work area defined for your mower. When the switch is on, the mower mows the corresponding area. When the switch is off, the mower doesn’t mow the corresponding area.
Actions
The integration offers the following actions:
Override schedule
With this action, you can let your mower mow or park for a given time. You can select the override mode with the `override_mode´ attribute. This will override all your schedules during this time. The duration can be given in days, hours and/or minutes. The values for the duration have to be between 1 minute and 42 days. Seconds will be ignored.
# Replace <name> with the name of your mower.
action: husqvarna_automower.override_schedule
target:
  entity_id: lawn_mower.<name>
data:
  duration:
    days: 1
    hours: 12
    minutes: 30
  override_mode: mow  ### alternative: `park`
Override schedule work area (if available)
With this action, you can let your mower mow for a given time in a certain work area. You can enter the work area with the work_area_id attribute. You can get the work_area_id from the Work area sensor.
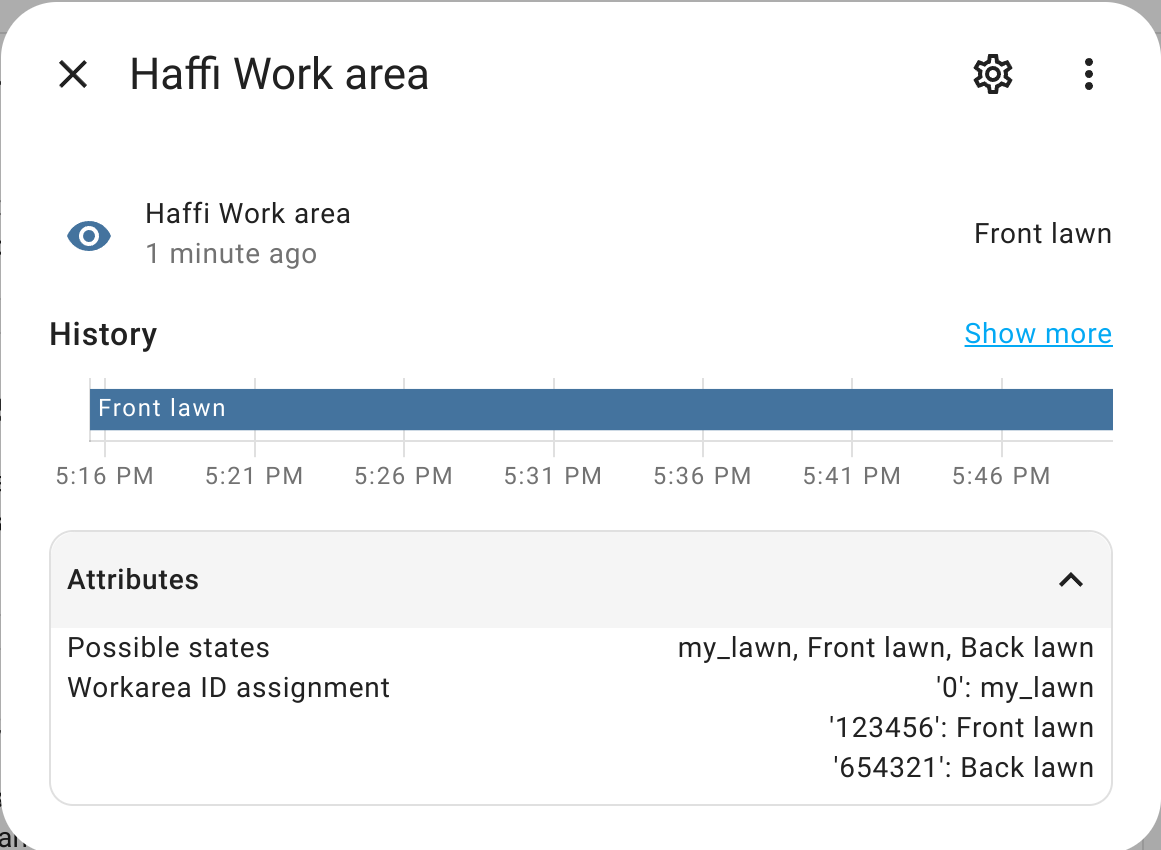 This will override all your schedules during this time. The duration can be given in days, hours, and/or minutes. The values for the duration have to be between 1 minute and 42 days. Seconds will be ignored.
# Replace <name> with the name of your mower.
action: husqvarna_automower.override_schedule_work_area
target:
  entity_id: lawn_mower.<name>
data:
  duration:
    days: 1
    hours: 12
    minutes: 30
  work_area_id: 123456 ### Work area ID for the "Front lawn" from the example above.
Known limitations
- The mower can only be started using the
lawn_mower.start_mowingaction during the schedules configured in the Automower Connect App. To start the mower outside the scheduled times, use thehusqvarna_automower.override_scheduleaction. In both cases, the battery must be fully charged beforehand. - Stay-out zone handling is not supported for mowers equipped with EPOS technology.
Removing the integration
This integration can be removed by following these steps:
To remove an integration instance from Home Assistant
- Go to Settings > Devices & services and select the integration card.
- From the list of devices, select the integration instance you want to remove.
- Next to the entry, select the three dots
menu. Then, select Delete.