LED Infrared
The LED Infrared integrationIntegrations connect and integrate Home Assistant with your devices, services, and more. [Learn more] lets you control lights with any infrared emitter that has been previously configured in Home Assistant. It can also receive commands from a remote when you have an infrared receiver set up, allowing you to use the remote to trigger automations in Home Assistant.
Because the integration communicates over infrared, it operates in a one-way, fire-and-forget fashion: commands are sent to the light, but there is no feedback channel to confirm the current state of the light. The integration therefore uses assumed states.
How you can use the integration
After setup, you can control your LED device from Home Assistant with the created light entity. Use it to turn the light on or off, adjust brightness, and select supported effects. If you configured an infrared receiver, the event entity lets you trigger automations from your remote control.
Supported devices
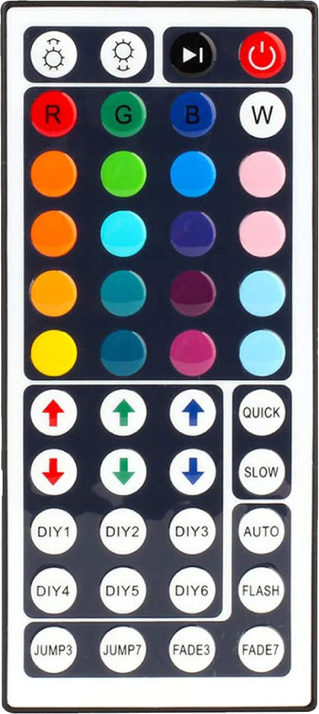
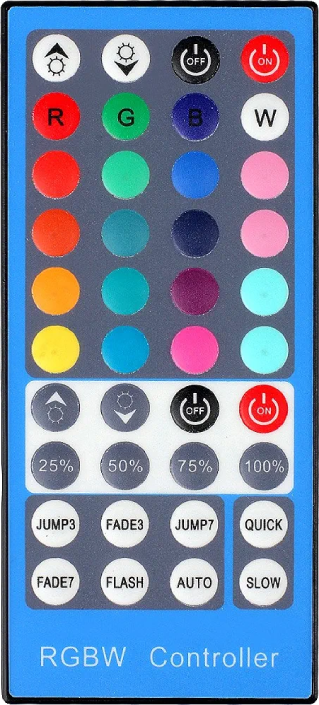
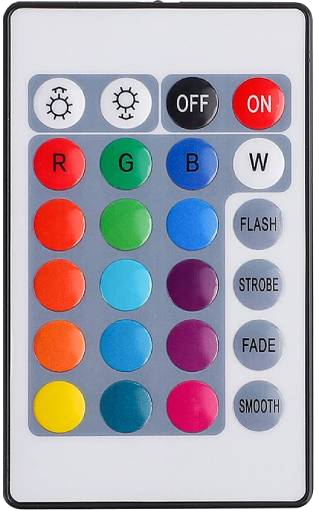
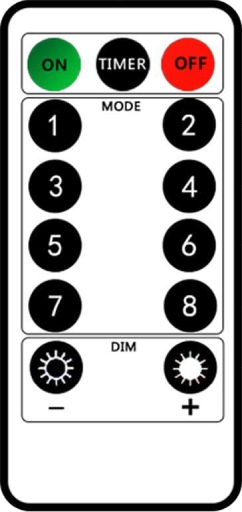
This integration supports many branded and unbranded LED bulbs, lamps, and LED strip controllers that use generic infrared remotes. If your device uses one of the remote controls listed below, it may be compatible with this integration.
44-key remote
40-key remote
24-key remote
13-key remote
Prerequisites
Before setting up the LED Infrared integration, you need a working infrared transmitter set up in Home Assistant that exposes an Infrared entity. For example, you can use an ESPHome device with an IR LED pointed at your lights.
Configuration
To add the LED Infrared device to your Home Assistant instance, use this My button:

If the above My button doesn’t work, you can also perform the following steps manually:
-
Browse to your Home Assistant instance.
-
In the bottom right corner, select the
Add Integration button. -
From the list, select LED Infrared.
-
Follow the instructions on screen to complete the setup.
Select the device type that matches your remote control, then select an infrared emitter.
The infrared emitter entity to use for sending commands to your device. This must be an entity provided by a hardware integration (such as ESPHome) that has already been set up with an IR emitter.
Supported functionality
The LED Infrared integration provides the following entities.
Lights
A light entity is created when an infrared emitter is configured.
-
Light
- Description: Represents the LED device and allows it to be controlled using infrared (IR) commands.
- Supported features: Turn on, turn off, and select effects.
- Available effects: Depend on the capabilities of the configured IR remote.
Buttons
-
Brightness up
- Description: Increases the brightness of the light by one step.
- Available for: 13-key remote, 24-key remote, 40-key remote, 44-key remote
-
Brightness down
- Description: Decreases the brightness of the light by one step.
- Available for: 13-key remote, 24-key remote, 40-key remote, 44-key remote
-
Timer
- Description: Enables the timer, turning the light on for 6 hours and off for 18 hours in a repeating 24-hour cycle.
- Available for: 13-key remote
-
Quick
- Description: Increases the speed of the currently selected dynamic effect.
- Available for: 40-key remote, 44-key remote
-
Slow
- Description: Decreases the speed of the currently selected dynamic effect.
- Available for: 40-key remote, 44-key remote
-
White brightness up
- Description: Increases the brightness of the dedicated white LEDs by one step.
- Available for: 40-key remote
-
White brightness down
- Description: Decreases the brightness of the dedicated white LEDs by one step.
- Available for: 40-key remote
-
White on
- Description: Turns on the dedicated white LEDs without affecting the RGB LEDs.
- Available for: 40-key remote
-
White off
- Description: Turns off the dedicated white LEDs without affecting the RGB LEDs.
- Available for: 40-key remote
-
White brightness 25%
- Description: Sets the dedicated white LEDs to 25% brightness.
- Available for: 40-key remote
-
White brightness 50%
- Description: Sets the dedicated white LEDs to 50% brightness.
- Available for: 40-key remote
-
White brightness 75%
- Description: Sets the dedicated white LEDs to 75% brightness.
- Available for: 40-key remote
-
White brightness 100%
- Description: Sets the dedicated white LEDs to 100% brightness.
- Available for: 40-key remote
-
Red up
- Description: Increases the intensity of the red color channel by one step.
- Available for: 44-key remote
-
Red down
- Description: Decreases the intensity of the red color channel by one step.
- Available for: 44-key remote
-
Green up
- Description: Increases the intensity of the green color channel by one step.
- Available for: 44-key remote
-
Green down
- Description: Decreases the intensity of the green color channel by one step.
- Available for: 44-key remote
-
Blue up
- Description: Increases the intensity of the blue color channel by one step.
- Available for: 44-key remote
-
Blue down
- Description: Decreases the intensity of the blue color channel by one step.
- Available for: 44-key remote
Events
An event entity is created when an infrared receiver is configured. It fires an event each time a remote command is received, so you can use the remote to trigger automations in Home Assistant.
-
Received command
- Description: Fires when a command from the remote is decoded from the infrared receiver. The fired event type matches the button pressed on the remote.
- Event types: Depend on the capabilities of the configured IR remote.
- Remarks: Only commands supported by the configured remote are processed. Signals from other remotes are ignored.
LED Infrared automation examples
The following example demonstrates how to automate an LED Infrared device. For additional automation examples, refer to the light platform actions reference.
You don’t need to edit YAML to use these examples. Copy a YAML snippet from this page, open the automation editor in Home Assistant, and press Ctrl+V (or Cmd+V on Mac). Home Assistant automatically converts the pasted YAML into the visual editor format, whether it’s a full automation, a single trigger, a condition, or an action.
Automation: Turning on the LED strip at night
-
Trigger: Sun: after sunset
- Target: Optional trigger target if needed
- Condition: Optional condition if needed
- Action: Turn on light
YAML example for turning on LED strip at night
alias: "Turn on the LEDs during the night"
triggers:
  - trigger: sun
    event: sunset
actions:
  - action: light.turn_on
    target:
      entity_id: light.led_strip
Known limitations
The integration uses assumed state, meaning Home Assistant cannot read the actual state of the light (for example, whether it is on or off, or what the current brightness is).
Troubleshooting
If your LED Infrared setup is not working as expected, first make sure the infrared emitter and receiver entities are available in Home Assistant and that your infrared hardware is placed correctly. If you are using an infrared receiver, verify that your remote is sending signals that Home Assistant can detect.
Some remotes can use overlapping infrared codes with other devices, which may cause the same code to be interpreted for different functions. If you notice unexpected behavior, try isolating the remote or checking whether another infrared device is using similar codes.
For additional troubleshooting steps and guidance, see the infrared troubleshooting section.
If you need to report an issue, enable debug logging, then reload the integration. Reproduce the issue, disable debug logging, and attach the automatically downloaded debug log to your report.
Removing the integration
This integration follows standard integration removal.
To remove an integration instance from Home Assistant
- Go to Settings > Devices & services and select the integration card.
- From the list of devices, select the integration instance you want to remove.
- Next to the entry, select the three dots
menu. Then, select Delete.