SolarEdge
The SolarEdge integrationIntegrations connect and integrate Home Assistant with your devices, services, and more. [Learn more] allows you to get details from your SolarEdge solar power setup and integrate these in your Home Assistant installation. It provides two main features:
- Site sensors: Provide real-time energy data for your entire site. For example, current power, energy today, and lifetime energy. This requires a site ID and an API key.
- Module-level statistics: Retrieves energy production data per inverter, string, and module, and inserts it into Home Assistant statistics. This is useful for identifying underperforming modules. This requires a site ID, username, and password.
You can configure either feature individually or both at the same time for the same site.
Configuration
To add the SolarEdge device to your Home Assistant instance, use this My button:

SolarEdge can be auto-discovered by Home Assistant. If an instance was found, it will be shown as Discovered. You can then set it up right away.
If it wasn’t discovered automatically, don’t worry! You can set up a manual integration entry:
-
Browse to your Home Assistant instance.
-
In the bottom right corner, select the
Add Integration button. -
From the list, select SolarEdge.
-
Follow the instructions on screen to complete the setup.
Site sensors (API key)
To get sensors for your installation, you need your installation’s site ID and an API key. You can get these by logging in to your SolarEdge web portal. Note: if your portal is not in English, the labels will be different.
- Click on Admin and scroll down to API Access
- Click on “Generate key”
- Click on Save
Sensor data is updated every 15 minutes to stay within the daily rate limit of 300 requests per day.
Module-level statistics (username & password)
To get detailed per-module production data, you need:
- A username and password with access to the SolarEdge web portal and the Layout tab there. If not, you will have to ask your installer to grant you access.
- Your site ID, which you can get from the URL once you log in (for example,
1234fromhttps://monitoring.solaredge.com/solaredge-web/p/site/1234/).
The integration fetches energy production for the past 7 days every 12 hours and inserts the data into statistics.
You can find the created statistics under Settings > Developer tools > Statistics, searching for solaredge:.
You can show them in the UI using the Statistic card or Statistics graph card.
You can use them in automations using the SQL integration.
Module statistics examples
Statistics graph
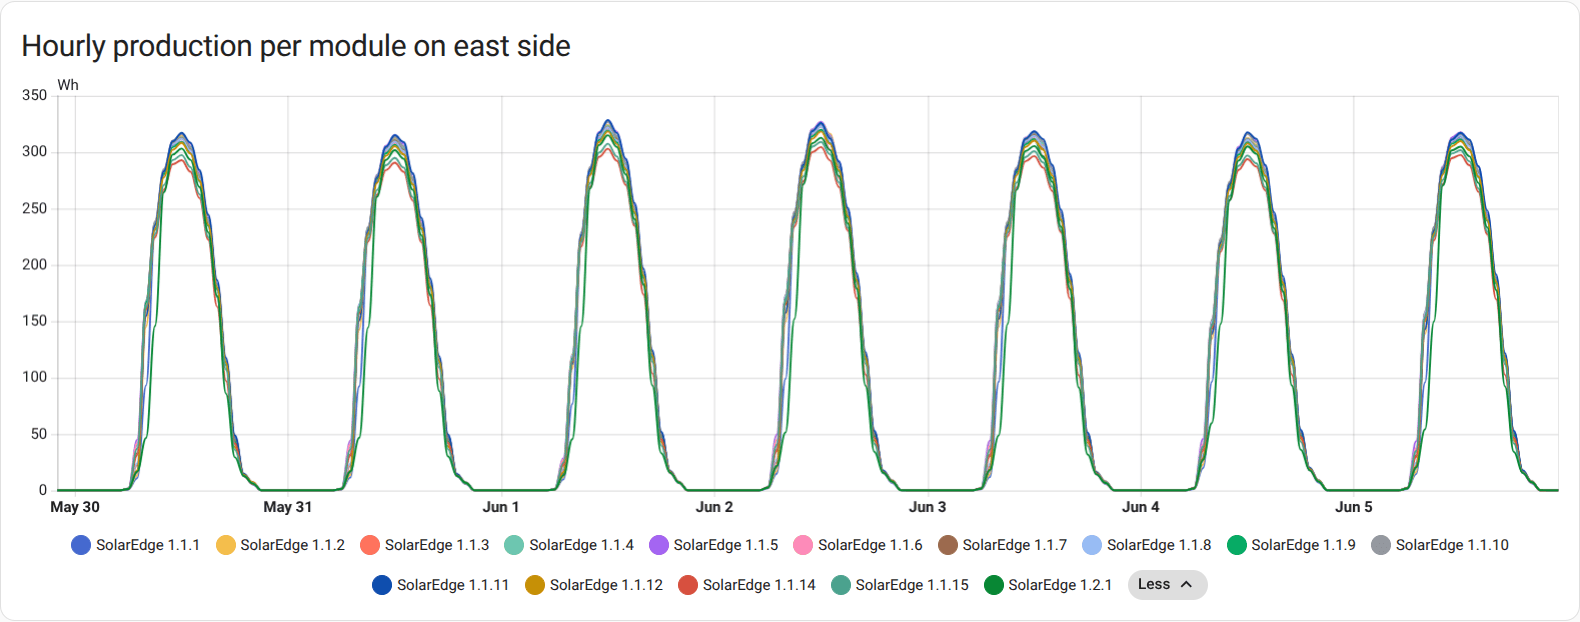
An example of a Statistics graph that shows hourly production per module for the past 7 days.
The statistic IDs below are examples. It’s recommended to use SHOW VISUAL EDITOR to select the statistics by name instead.
chart_type: line
period: hour
type: statistics-graph
entities:
  - solaredge:1234567_100000001
  - solaredge:1234567_100000002
  - solaredge:1234567_100000003
  - solaredge:1234567_100000004
stat_types:
  - change
days_to_show: 7
title: Hourly production per module on east side
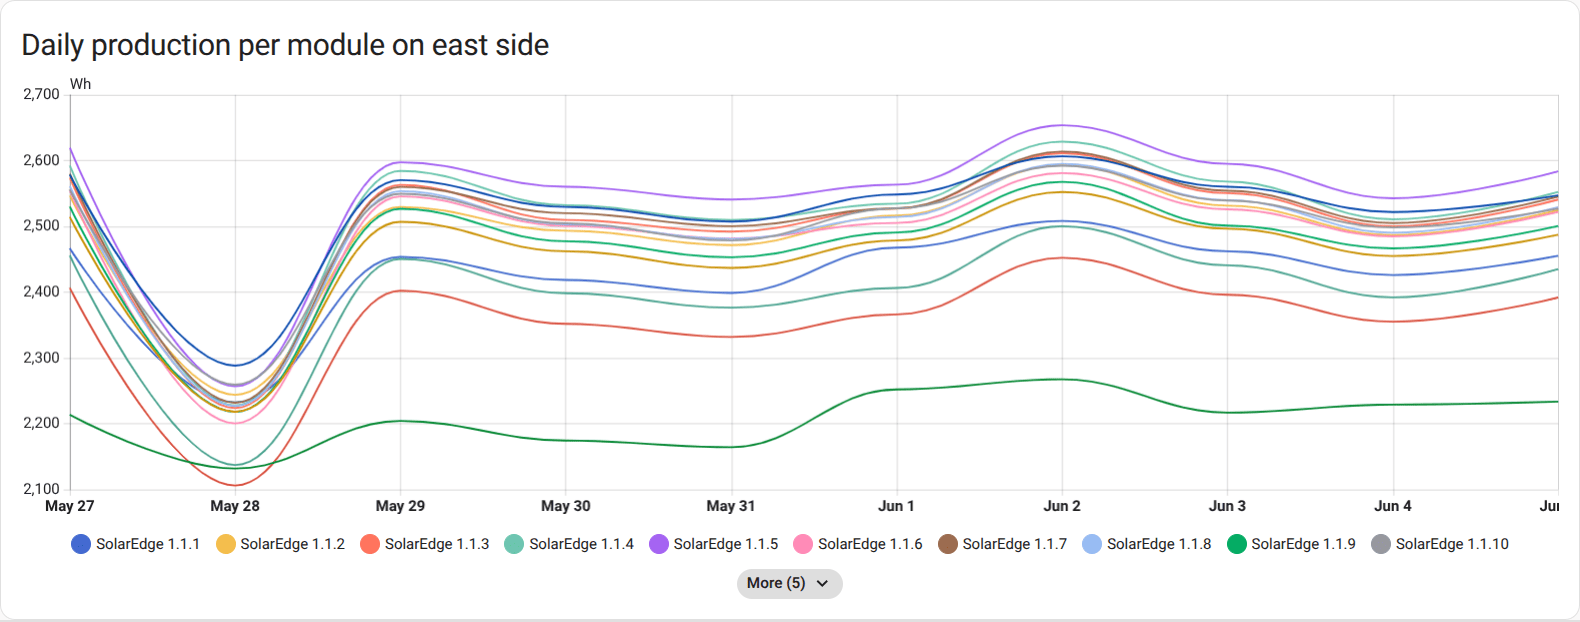
Another example of a Statistics graph that shows daily production per module for the past 30 days. It’s easier here to identify any problematic modules.
chart_type: line
period: day
type: statistics-graph
entities:
  - solaredge:1234567_100000001
  - solaredge:1234567_100000002
  - solaredge:1234567_100000003
  - solaredge:1234567_100000004
stat_types:
  - change
title: Daily production per module on east side
days_to_show: 30
SQL sensor for low production
To identify problematic modules, you could set up the SQL integration with the following:
The SQL code contains a couple of TODO items for you to adjust the threshold and to select the proper modules based on your solar installation. In the example, the panels on the east side contain “1.1.” in their name while the ones on the west contain “1.2.”.
Name: SolarEdge low production modules (East)
Column: problematic_modules
Query:
SELECT * FROM (
WITH RelevantTimeRange AS (
    -- Define the start and end timestamps for "past 7 days, ignoring today"
    -- start_ts is inclusive, end_ts is exclusive
    SELECT
        strftime('%s', date('now', 'localtime', 'start of day', '-7 days')) AS period_start_ts,
        strftime('%s', date('now', 'localtime', 'start of day')) AS period_end_ts
),
ModuleProduction AS (
    -- Calculate total production for each module in the relevant time period
    SELECT
        sm.name,
        SUM(s.state) AS total_production
    FROM statistics s
    JOIN statistics_meta sm ON s.metadata_id = sm.id
    CROSS JOIN RelevantTimeRange rt
    WHERE
        sm.source = 'solaredge'
        -- TODO: Adjust this to match your setup
        AND sm.name LIKE '% 1.1.%'
        AND s.start_ts >= rt.period_start_ts
        AND s.start_ts < rt.period_end_ts
        AND s.state IS NOT NULL
    GROUP BY
        sm.name
),
AverageProduction AS (
    -- Calculate the average production across all modules that produced something
    SELECT
        AVG(mp.total_production) AS average_total_production
    FROM ModuleProduction mp
    WHERE total_production > 0
)
SELECT
    IFNULL(
        GROUP_CONCAT(
            mp.name || ' (' || printf("%.1f", (mp.total_production * 100.0 / ap.average_total_production)) || '%)',
            ', '
        ),
        ''
    ) AS problematic_modules
FROM
    ModuleProduction mp, AverageProduction ap -- Implicit cross join, AP will have 1 row
WHERE
    -- TODO: Adjust the 95% threshold if needed
    mp.total_production < (0.95 * ap.average_total_production)
    AND ap.average_total_production IS NOT NULL
    AND ap.average_total_production > 0 -- Avoid division by zero if no production at all
) AS result
This will result in a sensor with a state. For example, SolarEdge 1.1.13 (94.7%), SolarEdge 1.1.14 (94.2%)
Because this SQL sensor will unnecessarily be updating every 30 seconds, in the SQL integration entries page, select 3 dots, System options, uncheck Enable polling for changes, and select UPDATE.
Finally, create an automation that updates the sensors and notifies you. Example:
Update the SQL sensor entity IDs to match your setup.
alias: "Notify: Low solar production modules"
triggers:
  - trigger: time
    at: "11:00:00"
conditions: []
actions:
  - action: homeassistant.update_entity
    data:
      entity_id:
        - sensor.solaredge_low_production_modules_east
        - sensor.solaredge_low_production_modules_west
  - if:
      - condition: template
        value_template: |-
          {{ states('sensor.solaredge_low_production_modules_east') != '' or
             states('sensor.solaredge_low_production_modules_west') != '' }}
    then:
      - action: persistent_notification.create
        data:
          message: >-
            East: {{ states('sensor.solaredge_low_production_modules_east') |
            default('N/A') }}

            West: {{ states('sensor.solaredge_low_production_modules_west') |
            default('N/A') }}
          title: Low production detected on solar modules
          notification_id: solaredge_modules_low_production_alert
mode: single
Known limitations
Specifically for the module statistics:
- The integration intentionally doesn’t create any entities/sensors for module data. All data is only available in statistics. This is because data is often delayed by a couple of hours.
- The statistics are intentionally updated infrequently (every 12 hours). If you want more frequent updates, you can call the
homeassistant.reload_config_entryaction from an automation. - The API provides data at a 15-minute interval, but Home Assistant long-term statistics are limited to a 1-hour interval. The integration aggregates the 15-minute data into hourly statistics.
Removing the integration
To remove an integration instance from Home Assistant
- Go to Settings > Devices & services and select the integration card.
- From the list of devices, select the integration instance you want to remove.
- Next to the entry, select the three dots
menu. Then, select Delete.