Using automation blueprints
Automation blueprints are pre-made automationsAutomations in Home Assistant allow you to automatically respond to things that happen in and around your home. [Learn more] that you can easily add to your Home Assistant instance. Each blueprint can be added as many times as you want.
Quick links:
Blueprint automations
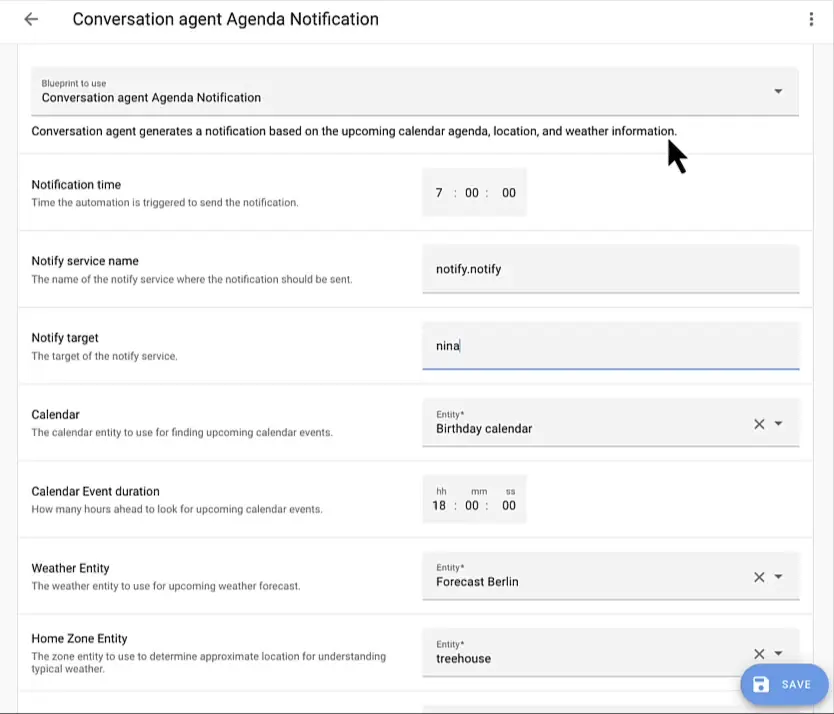
Automations based on a blueprint need to be configured. What needs to be configured differs by blueprint.
- To create your first automation based on a blueprint, go to Settings > Automations & scenes > Blueprints.
- Find the blueprint that you want to use and select Create automation.
- This opens the automation editor with the blueprint selected.
- Give it a name and configure the blueprint.
- Select the blue Save automation button in the bottom right corner.
Done! If you want to revisit the configuration values, go to Settings > Automations & scenes > Blueprints.
Importing blueprints
Home Assistant can import blueprints from the Home Assistant forums, GitHub, and GitHub gists.
-
To import a blueprint, first find a blueprint you want to import.
-
If you just want to practice importing, you can use this URL:
https://github.com/home-assistant/core/blob/dev/homeassistant/components/automation/blueprints/motion_light.yaml
-
-
Select the blue Import Blueprint button in the bottom right.
- A new dialog will pop-up asking you for the URL.
-
Enter the URL and select Preview.
- This will load the blueprint and show a preview in the import dialog.
- You can change the name and finish the import.
The blueprint can now be used for creating automations.
Editing an imported blueprint
You can tweak an imported blueprint by “taking control” of this blueprint. Home Assistant then converts the blueprint automation into a regular automation, allowing you to make any tweak without having to fully re-invent the wheel.
To edit an imported blueprint, follow these steps:
-
Select the blueprint from the list.
-
Select the
and select Take control. -
A preview of the automation is shown.
- Info: By taking control, the blueprint is converted into an automation. You won’t be able to convert this back into a blueprint.
- To convert it into an automation and take control, select Yes.
- If you change your mind and want to keep the blueprint, select No.

Re-importing a blueprint
Blueprints created by the community may go through multiple revisions. Sometimes a user creates a blueprint, the community provides feedback, new functionality is added.
The quickest way to get these changes, is by re-importing the blueprint. This will overwrite the blueprint you currently have.
Before you do this: If the re-imported blueprint is not compatible, it can break your automations.
-
In this case, you will need to manually adjust your automations.
To re-import a blueprint
- Go to Settings > Automations & scenes > Blueprints.
- On the blueprint that you want to re-import, select the three dots
menu, and select Re-import blueprint.
Updating an imported blueprint in YAML
Blueprints created by the community may go through multiple revisions. Sometimes a user creates a blueprint, the community provides feedback, new functionality is added.
If you do not want to re-import the blueprint for some reason, you can manually edit
its YAMLYAML is a human-readable data serialization language. It is used to store and transmit data in a structured format. In Home Assistant, YAML is used for configuration, for example in the configuration.yaml or automations.yaml files. [Learn more] content to keep it up to date:
- Go to the blueprints directory (
blueprints/automation/). The location of this directory depends on the installation type. It’s similar to how you findconfiguration.yaml. - Next, you must find the blueprint to update. The path name of a blueprint consists of:
- The username of the user that created it. The name depends on the source of the blueprint: the forum, or GitHub.
- The name of the YAMLYAML is a human-readable data serialization language. It is used to store and transmit data in a structured format. In Home Assistant, YAML is used for configuration, for example in the
configuration.yamlorautomations.yamlfiles. [Learn more] file. For the forum it’s the title of the topic in the URL, for GitHub it’s the name of the YAML file.
- Open the YAML file with your editor and update its contents.
- Reload the automations for the changes to take effect.
The new changes will appear to your existing automations as well.
Finding new blueprints
The Home Assistant Community forums have a specific tag for blueprints. This tag is used to collect all blueprints.
Visit the Home Assistant forums
Creating new blueprints
Using blueprints is nice and easy, but what if you could create that one missing blueprint that our community definitely needs?
Learn more about blueprints by reading our tutorial on creating a blueprint.
Troubleshooting missing automations
When you’re creating automations using blueprints and they don’t appear in the UI, make sure that you add back automation: !include automations.yaml from the default configuration to your configuration.yamlThe configuration.yaml file is the main configuration file for Home Assistant. It lists the integrations to be loaded and their specific configurations. In some cases, the configuration needs to be edited manually directly in the configuration.yaml file. Most integrations can be configured in the UI. [Learn more].