Daily summary by Assist
In this tutorial, we are creating an automation that has Assist send you a daily summary. Assist will tell you about the weather and your calendar events today. It will also send you the summary to your messenger.
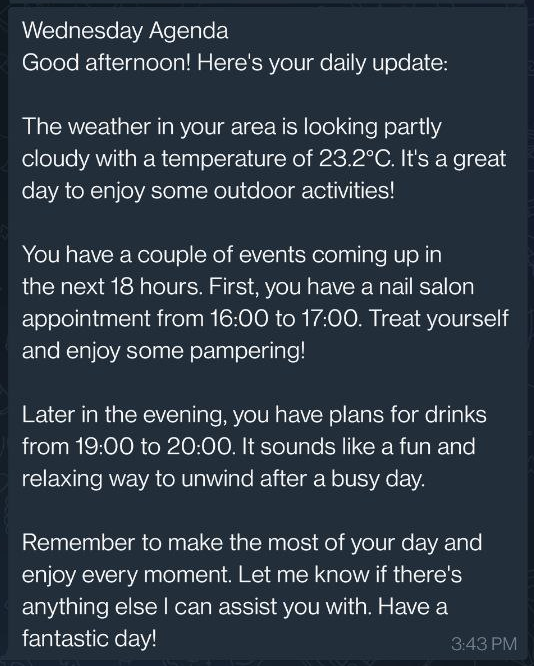 Daily summary notification - using a neutral tone
We will be using OpenAI, which requires an OpenAI account. For what we do in this tutorial, the free trial option is sufficient. No need to leave your credit card information.
Prerequisites
This tutorial assumes you have a few things set up already:
- Home Assistant Cloud or a manually configured local assistant pipeline.
This tutorial was done using the Local calendar, the Meteorologisk institutt, and the Telegram integrations. It has not been tested with other integrations of the notifications or calendar category.
Adding a calendar
Skip this if you’re already using a calendar.
- Go to the integrations page and select the calendar Calendar filter.
- Pick a calendar you like and install it as described in the documentation.
- If you just want to follow along with this tutorial, install the local calendar integration.
-
When prompted for a name, call it
Local calendar. -
In the navigation bar on the left, you should now see a new entry for the calendar. Open it.

-
Add a few events for today and the next few days.
-
Adding a weather integration
Skip this if you’re already using a weather integration.
- Go to the integrations page and select the Weather filter.
- Pick a calendar you like and install it as described in the documentation.
- If unsure, select Meteorologisk institutt and add the integration.
- When prompted, enter the latitude and longitude of your home.
- The coordinates allow the integration to show the weather forecast for your location.
Connect Home Assistant to a messenger service
Skip this if you’re already using a notification integration.
- Go to the integrations page and select the Notifications filter.
- Pick a messenger service you like and install it as described in the documentation.
- If unsure, select Telegram and add the integration.
- If you don’t have it already, install Telegram on your phone.
- To get started with Telegram on Home Assistant, follow the set up instruction step by step.
- Make sure not to copy and paste the following values from the example. Enter the real values:
api_keyallowed_chat_idsnamechat_idservice
- Make sure not to copy and paste the following values from the example. Enter the real values:
- You now have a working Notification integration. Home Assistant can now send messages to you.
Creating an OpenAI voice assistant personality
The OpenAI personality gives the messages a special touch. Using OpenAI requires an OpenAI account. For this tutorial, the free trial option is sufficient. No need to leave your credit card information.
Creating an automation from a blueprint
We are using a blueprint (courtesy of @allenporter) that polls calendar events and collects weather information. It then asks ChatGPT to summarize it and ships that response to your phone.
-
To import the blueprint, select the button below:

Prefer to configure this automation manually? Use the YAML below.
Automation YAML
Replace the placeholder values with values from your Home Assistant instance.
alias: Conversation agent Agenda Notification
trigger:
  platform: time
  at: 25200.0

action:
  - variables:
      weather_entity: YOUR_WEATHER_ENTITY
      calendar_entity: YOUR_CALENDAR_ENTITY
      zone_entity: YOUR_ZONE_ENTITY
      calendar_duration: hours: 18
      prompt: |-
  Please generate text for a notification that will be sent to the users
  smartphone with helpful information.

  You are a helpful personal agent that generates text for the user:
  - Your answers are helpful, friendly, warm, insightful.
  - Your answers are not technical, and do not include Home Assistant internal details such as entities in responses.
  - Your messages help the user prepare for their day, for example:
    - Making note of unusual weather for the location and time of year (but not mundane details like "0% chance of precipitation")
    - How much time remaining until their first meeting
    - Anything that may be special or unique, such as celebrating a birthday
  - alias: Fetch Weather Forecast
    action: weather.get_forecasts
    data:
      type: hourly
    target:
      entity_id:
        - "{{ weather_entity }}"
    response_variable: daily_forecast
  - variables:
      forecast_entity: "{{ daily_forecast[weather_entity] }}"
      forecast: "{{ forecast_entity.forecast[0] }}"
  - alias: Fetch Calendar Agenda
    action: calendar.get_events
    data:
      duration: hours: 18
    target:
      entity_id: YOUR_CALENDAR_ENTITY
    response_variable: events_response
  - alias: "Conversation Agent Notification Text"
    action: conversation.process
    data:
      text: |-
        Time: {{ now().strftime("%A %B %d %H:%M %p") }}
        {%- if weather_entity is defined %}
        {%- set temperature_unit = state_attr(weather_entity, 'temperature_unit') -%}
        Forecast: {{ forecast.condition }} ({{ forecast.temperature }}{{ temperature_unit }}, {{ forecast.precipitation }}% precipitation)
        {%- endif %}

        Calendar "{{ state_attr(calendar_entity, 'friendly_name') }}" events for the next {{ calendar_duration.hours }} hours:
        {%- set agenda = (events_response | items | first)[1] %}
        {%- if agenda.events %}
          {%- for event in agenda.events %}
          - Summary: {{ event.summary }}
            Start-End: {% if event.start is defined %}{{ event.start }} to {{ event.end }}{% else %}All Day{% endif %}
            {%- if event.description is defined %}
            Description: {{ event.description }}
            {% endif -%}
            {%- if event.location is defined %}
              Location: {{ event.location }}
            {% endif -%}
          {%- endfor %}
        {%- else %}
          - No upcoming events.
        {%- endif %}

        {{ prompt }}
      agent_id: YOUR_CONVERSATION_AGENT
    response_variable: agent
  - alias: "Send notification"
    action: notify.notify
    data:
      target:
      title: "{{ now().strftime('%A') }} Agenda"
      message: "{{ agent.response.speech.plain.speech }}"
- Select Preview, then select Import blueprint.
- Select the blueprint Conversation agent agenda notification from the list.
- Enter the values for each category.
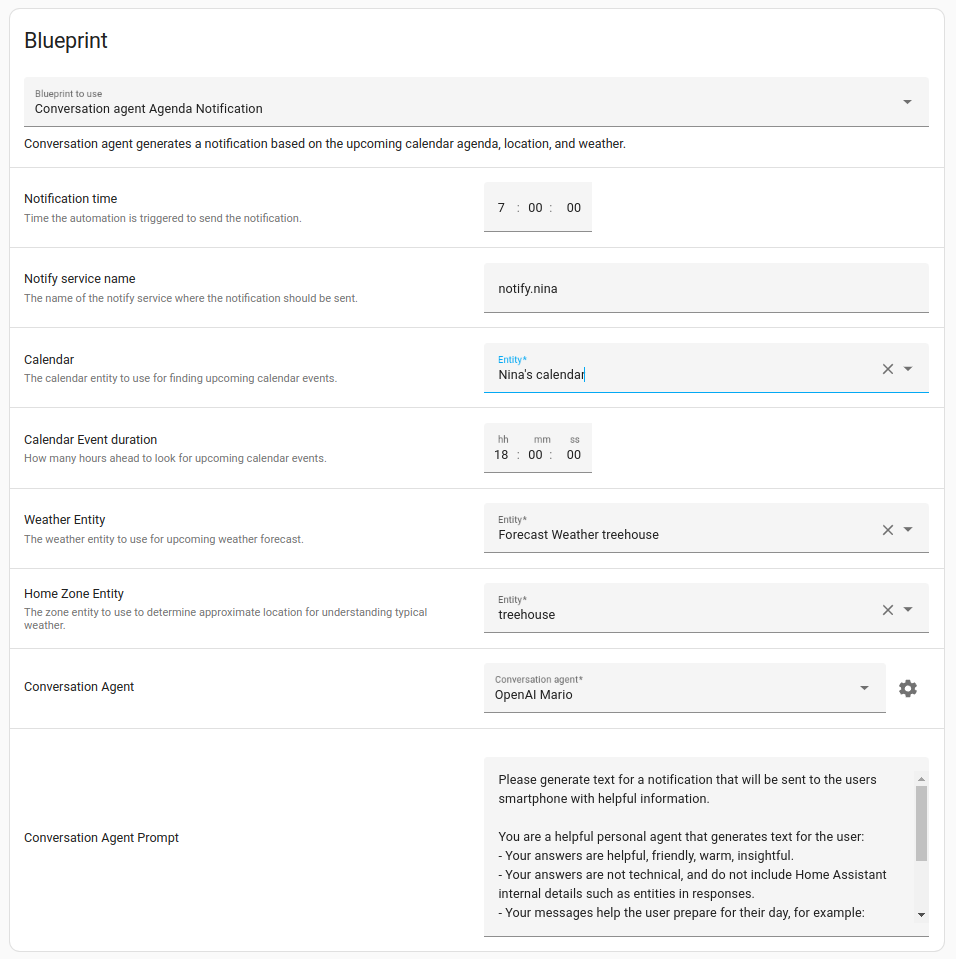
- Under Notify service name, make sure not to leave the default but to use the one you set up previously. For example
notify.nina. - Save your changes.
- In the dialog, enter a name for your new automation. For example,
Daily summary by Mario.
- Under Notify service name, make sure not to leave the default but to use the one you set up previously. For example
- To view the automation, go to Settings > Automations & Scenes.
- To test the automation, select the three dots on your automation, and select Run.
- You should now receive a notification from Assist in your messenger app.