

Backups
It is important to regularly back up your Home Assistant setup. You may have spent many hours configuring your system and creating automations. Keep your configurations safe so that you can restore a system or migrate your Home Assistant to new hardware.
What a backup contains and where it’s stored
Backups are encrypted by default and stored in a compressed archive file (.tar). By default, Home Assistant stores them locally, in one of the following folders:
- On Home Assistant Operating SystemHome Assistant OS, the Home Assistant Operating System, is an embedded, minimalistic, operating system designed to run the Home Assistant ecosystem on single board computers (like the Raspberry Pi) or Virtual Machines. It includes Home Assistant Core, the Home Assistant Supervisor, and supports apps. Home Assistant Supervisor keeps it up to date, removing the need for you to manage an operating system. Home Assistant Operating System is the recommended installation type for most users., backups are in the
/backupfolder. - On Home Assistant ContainerHome Assistant Container is a standalone container-based installation of Home Assistant Core. Any OCI compatible runtime can be used, but the documentation focus is on Docker. [Learn more], for example when you run Home Assistant in Docker, backups are in the
backupsfolder of your configuration directory.
On Home Assistant OS, you choose what a backup contains. When you create a backup, you can select the following parts:
-
Home Assistant settings are the bare minimum needed to restore the system. They include the
configfolder and the SSL certificates in thesslfolder. Automatic backups always include them. - History is the historical data of your sensors, including your energy dashboard. It’s stored in the default database. If you use a MariaDB or PostgreSQL database on another system, that database isn’t included.
-
Media is the
mediafolder, for example, with camera recordings. -
Share folder is the
sharefolder. Apps often use it for custom or older configurations. - Local apps folder contains the files of apps that you created yourself. The installed apps and their data are backed up under Apps.
- Apps lets you include all apps, no apps, or the apps that you select.
Some actions still use older terms. A full backup contains all of these parts, unless you exclude the history. A partial backup contains only the parts that you choose. For example, refer to Create a full backup and Create a partial backup.
On Home Assistant Container, a backup contains the Home Assistant settings and, if you choose, the history. Apps, the media and share folders, and network storage are only available on Home Assistant OS.
What isn’t in a backup
Some files are never part of a backup, because Home Assistant creates them again, or because they would make the backup much larger. A backup doesn’t contain the following files:
- Log files, such as
home-assistant.log. - Caches and temporary files, such as the
ttsfolder with cached text-to-speech audio, and the.cachefolder. - Backup files in the
backupsandtmp_backupsfolders inside the configuration folder, so that a backup doesn’t contain older backups. A backup file that you copied to another place in the configuration folder is included. - On Home Assistant Operating SystemHome Assistant OS, the Home Assistant Operating System, is an embedded, minimalistic, operating system designed to run the Home Assistant ecosystem on single board computers (like the Raspberry Pi) or Virtual Machines. It includes Home Assistant Core, the Home Assistant Supervisor, and supports apps. Home Assistant Supervisor keeps it up to date, removing the need for you to manage an operating system. Home Assistant Operating System is the recommended installation type for most users., files that Home Assistant marked as damaged.
The history is only included if you select it. On Home Assistant Operating SystemHome Assistant OS, the Home Assistant Operating System, is an embedded, minimalistic, operating system designed to run the Home Assistant ecosystem on single board computers (like the Raspberry Pi) or Virtual Machines. It includes Home Assistant Core, the Home Assistant Supervisor, and supports apps. Home Assistant Supervisor keeps it up to date, removing the need for you to manage an operating system. Home Assistant Operating System is the recommended installation type for most users., the same applies to the media folder, the share folder, and apps. To see which parts you can select, refer to What a backup contains and where it’s stored.
If Home Assistant stores its history in another database, such as MariaDB or PostgreSQL, that database isn’t part of the Home Assistant settings in a backup. Where it’s backed up depends on where it runs:
- On Home Assistant Operating SystemHome Assistant OS, the Home Assistant Operating System, is an embedded, minimalistic, operating system designed to run the Home Assistant ecosystem on single board computers (like the Raspberry Pi) or Virtual Machines. It includes Home Assistant Core, the Home Assistant Supervisor, and supports apps. Home Assistant Supervisor keeps it up to date, removing the need for you to manage an operating system. Home Assistant Operating System is the recommended installation type for most users., if you run the database as an app, such as the MariaDB app, the database is backed up with the app. Include the app in the backup.
- If the database runs on another system, it’s never part of a backup. Back it up separately, for example, with the backup tools of the database.
For more about other databases, refer to Custom database engines.
Preparing for a backup
Before creating a backup, check if you can reduce the size of the backup. This is especially important if you want to use the backup to migrate the system to new hardware, for example from a Raspberry Pi Compute Module 4 to a Raspberry Pi Compute Module 5.
- Check if your configuration directory contains a large database file:
- Go to Settings > System > Repairs.
- From the three dots
menu, select System information and under the Recorder section, look for the Estimated database size (MiB). - By default, the data is kept for 10 days. If you have modified that to a longer period, check the
recorderintegration page for options to keep your database data down to a size that won’t cause issues. - Note the
purge_keep_daysoption, and the include and exclude options.
- On Home Assistant OS, to check how much space you’ve used in total, go to Settings > System > Repairs.
- From the three dots
menu, select System information, and check under Home Assistant Supervisor > Disk used. - If you have apps installed that you no longer use, uninstall those apps. Some apps require quite a bit of space. For the steps, refer to Uninstalling an app.
- From the three dots
- If you want to store the backup on your network storage instead of just locally on your system, follow the steps on adding a new network storage and select the Backup option.
Setting up an automatic backup process
The automatic backup process creates a backup on a schedule and also deletes old automatic backups.
- Go to Settings > System > Backups.
- On the Set up backups card, select Set up backups.
- Result: The Encryption key step opens.
- Under Download emergency kit, select Download, and store the file somewhere safe.
- You need the encryption key in the emergency kit to restore your backups.
- To learn more about backup encryption, refer to the documentation on the backup emergency kit.
- Select Next.
- Choose how to set up your automatic backups:
- To use the recommended settings, select Recommended. Home Assistant backs up everything daily, except media, the share folder, and the local apps folder, and keeps the last 3 backups. It stores the backups on this system, and on Home Assistant Cloud if you are logged in.
- Result: Home Assistant saves the settings and creates the first backup. You’re done.
- To choose your own settings, select Custom, and continue with the next step.
- To use the recommended settings, select Recommended. Home Assistant backs up everything daily, except media, the share folder, and the local apps folder, and keeps the last 3 backups. It stores the backups on this system, and on Home Assistant Cloud if you are logged in.
- On the Automatic backups step, define the schedule:
- Under Schedule, select Daily, or select Custom days to back up on specific days.
- Under Time, select System optimal to let Home Assistant pick a time after it cleans up its database. To pick the time yourself, select Custom.
- Make sure you pick a time when all your backup locations are available. Otherwise, the backup fails for the locations that aren’t available.
- Under Retention, define how many backups to keep, or for how many days.
- Older automatic backups are deleted. For example: if you back up daily and keep 7 backups, the backups that are older than 7 days are deleted.
- These retention settings do not delete manual backups. However, Home Assistant Cloud replaces its previous backup whenever a new backup is uploaded, even if the previous backup was created manually.
- App update backups have their own limit. For details, refer to App update backups.
- Select Next.
- On the Backup data step, define the data you want to back up, and select Next.
- It is recommended to leave out media and the share folder to reduce the size of the backup.
- A large backup also takes longer to restore.
- Some apps may also be quite large.
- On the Locations step, turn on the locations where you want to store your backups.
- To learn more about the locations, refer to the section on defining backup locations.
- Select Save and create backup.
- Result: Home Assistant saves the settings and creates the first backup.
To change these settings later, go to Settings > System > Backups, and on the Automatic backup card, select Configure backup settings. On Home Assistant OS, this page also has Backup preference when updating. It defines whether Home Assistant creates a backup before an update. You can change this each time you update.
To download the emergency kit again, or to show or change your encryption key, use the Encryption key card on the backups page.
Defining backup locations
You might need a backup in case your system has crashed. If you only store backups on the device itself, you won’t be able to access them easily. It is recommended to keep a copy on another system (outside of Home Assistant) and ideally also one off-site.
You will find an overview of integrations which provide a backup location here.
About the backup storage on Home Assistant Cloud
If you have Home Assistant Cloud, you can store a backup of maximum 5 GB on Home Assistant Cloud. This cloud storage space is available for all existing and new Home Assistant Cloud subscribers without additional cost. It stores one backup file: the backup that was last saved to Home Assistant Cloud. These backups are always encrypted. To restore encrypted backups, you need the encryption key stored in the backup emergency kit.
To define the backup location for automatic backups
- Go to Settings > System > Backups, and on the Automatic backup card, select Configure backup settings.
- Under Locations, turn on all the backup locations you want to use.
- If you don’t see Home Assistant Cloud in the list, you are not logged in.
- If you want to back up to your NAS (such as Synology) or a cloud provider (such as Google Drive or Microsoft OneDrive), check their integration documentation for specific instructions on setting up a Home Assistant backup.
- If you don’t see your network storage or local disk, you haven’t added it with the Backup usage. Follow the steps on adding a new network storage or adding a local disk, and select the Backup usage.
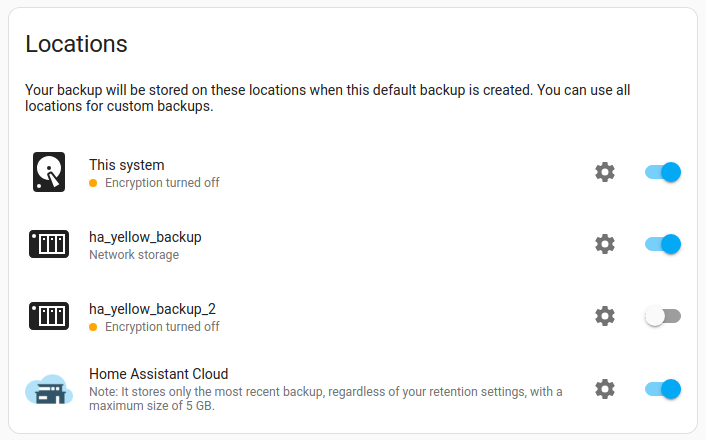
- To change the encryption or the retention of a location, select the cog
next to it. - Under Encryption, select Turn off or Turn on. Backups on Home Assistant Cloud are always encrypted.
- Under Retention for this system, or the retention for another location, select Use global settings, or set a retention for this location only. Home Assistant Cloud always keeps only one backup.
Creating a backup automation using the backup action
If the backup automation settings provided in the UI do not match your use case, you can manually configure your own backup automation using the backup.create_automatic action.
Using the backup.create_automatic action in your own automation allows you to create automated backups on any schedule you like, or even add conditions and actions around it. For example, you could make an automation that triggers on a calendar, turns on your NAS, waits until it is online, and then triggers a backup.
To get notified when an automatic backup fails, use the event entity and sensors of the Backup integration.
Creating a manual backup
This creates a backup instantly. You can create a manual backup at any time, irrespective of any automatic backups you may have defined.
- Go to Settings > System > Backups.
- In the lower-right corner, select Backup now.
- If you haven’t set up backups yet, the setup opens instead. Follow the steps on setting up an automatic backup process.
- Select Manual backup.
- On the Backup data step, define the data you want to back up, and select Next.
- It is recommended to leave out media and the share folder to reduce the size of the backup.
- A large backup also takes longer to restore.
- Some apps may also be quite large.
- On the Synchronization step, enter a Backup name, and choose the Locations.
- To learn more about the locations, refer to the section on defining backup locations.
- To store the backup on Home Assistant Cloud, include the Home Assistant settings in the backup data.
- To start the backup process, select Create backup.
- A bar at the top of the Backup page shows the progress, including the upload progress to some locations.
Downloading your local backups
When you download a backup from the Home Assistant backup page, it is decrypted on the fly, so that you can view the data using your favorite archive tool. This works for all backup locations, including Home Assistant Cloud, if the backup uses your current encryption key. If the backup uses a different key, Home Assistant asks for that key. You can also download the backup encrypted.
To store a local backup on another device, you can download it from the backups page, or copy it from the backup folder.
To download a backup from the backups page
- Under Settings > System > Backups, select Show all backups.
- In the list, on the row of the backup you want to download, select the three dots
menu and select Download. - Result: The backup is stored in the Downloads folder of your computer.
- If a backup is stored in several locations, you can choose where to download it from:
- Select the backup, and under Locations, select the three dots
and select Download from this location.
- Select the backup, and under Locations, select the three dots
To copy backups from the backup folder
On Home Assistant Operating SystemHome Assistant OS, the Home Assistant Operating System, is an embedded, minimalistic, operating system designed to run the Home Assistant ecosystem on single board computers (like the Raspberry Pi) or Virtual Machines. It includes Home Assistant Core, the Home Assistant Supervisor, and supports apps. Home Assistant Supervisor keeps it up to date, removing the need for you to manage an operating system. Home Assistant Operating System is the recommended installation type for most users., you can also copy backups directly from the backup folder.
- If you haven’t already done so, configure access to files on Home Assistant, using one of the methods listed there.
- For example, use the Samba share app.
- In your file explorer, access Home Assistant, open the
backupfolder and copy the file to your computer.
Downloading a backup from Home Assistant Cloud
If you were logged in to Home Assistant Cloud and had Cloud backup enabled when creating a backup, your last backup is stored on Home Assistant Cloud.
You can download the backup from the backups page in Home Assistant, or from your Home Assistant Cloud account.
To download a Home Assistant Cloud backup from the backups page
- In Home Assistant, go to Settings > System > Backups and select Show all backups.
- Select the backup from the list.
- Under Locations, select the three dots
and select Download from this location.
To download a backup from your Home Assistant Cloud account
- Log in to your Home Assistant Cloud account.
- Under Cloud services > Backups, find the latest available backup file, and select Download.
App update backups
On Home Assistant Operating SystemHome Assistant OS, the Home Assistant Operating System, is an embedded, minimalistic, operating system designed to run the Home Assistant ecosystem on single board computers (like the Raspberry Pi) or Virtual Machines. It includes Home Assistant Core, the Home Assistant Supervisor, and supports apps. Home Assistant Supervisor keeps it up to date, removing the need for you to manage an operating system. Home Assistant Operating System is the recommended installation type for most users., Home Assistant can create a backup of an app before it updates the app. This app update backup contains the app and its data, so you can go back to the previous version of the app if needed.
- App update backups are stored in the default local backup location. This is the system itself, unless you added network storage for backups. The first network storage that you add with the Backup usage becomes the default location. For details, refer to Change default local backup location.
- By default, Home Assistant keeps one app update backup per app, and deletes older ones.
- The retention of automatic backups doesn’t delete app update backups.
Changing app update backup settings
- Go to Settings > System > Backups, and select the App update backup card.
- Result: The App update backups page opens.
- Under Backup preference when updating, select Backup before update or Skip backups.
- You can still change this each time you update an app.
- Under Retention, enter how many app update backups to keep per app.
Deleting obsolete backups
If you defined a retention for automatic backups, old automatic backups are deleted automatically. The retention doesn’t delete manual backups, so you might still have some old backups around that you want to delete. Home Assistant Cloud is an exception: it only keeps the last backup that was uploaded to it, also if that’s a manual backup.
You can delete backups in Home Assistant. A backup on Home Assistant Cloud can also be deleted from your Home Assistant Cloud account.
To delete backups in Home Assistant
- Go to Settings > System > Backups and select Show all backups.
- Delete one or more backups:
- To delete one backup, select it from the list. Then, select the three dots
menu and select Delete. - To delete several backups, select the
Enter selection mode button. Select the backups that you want to delete, and then select Delete selected. - Consider keeping at least one recent backup, so that you can recover your system if needed.
- Result: The backups are deleted from all their locations, including Home Assistant Cloud.
- To delete one backup, select it from the list. Then, select the three dots
To delete a backup from your Home Assistant Cloud account
- Log in to your Home Assistant Cloud account.
- Under Backups, delete the backup.
Restoring a backup
There are two ways to use a backup:
- On your current system to recover your settings.
- During onboarding, to migrate your setup to a new device or to a device on which you performed a factory reset.
Estimated duration
The time it takes to restore a backup depends on the size of the backup and on your hardware. Home Assistant reinstalls Home Assistant Core and all apps. For a larger installation, a restore can take about 45 minutes.
Home Assistant restores directly from the backup, without making a temporary copy of it first. This saves free space and time, especially for backups on network storage.
Don’t turn off or unplug the system while the restore runs. To check that the restore is still running, refer to The restore seems stuck or shows “Not found”.
Restoring a backup during onboarding
You can use a backup during the onboarding process to restore your configuration.
Migration: This procedure also works if you want to migrate from one device to another. In that case, use the backup of the old device on the new device. The target device can be a different device type. For example, you can migrate from a Raspberry Pi to another device.
Prerequisites
- This procedure assumes you have already completed the installation procedure on your target device and are now viewing the welcome screen as part of the onboarding.
- The login credentials of the device from which you made the backup.
- The backup emergency kit that contains the key needed to decrypt the backup.
- On Home Assistant Operating SystemHome Assistant OS, the Home Assistant Operating System, is an embedded, minimalistic, operating system designed to run the Home Assistant ecosystem on single board computers (like the Raspberry Pi) or Virtual Machines. It includes Home Assistant Core, the Home Assistant Supervisor, and supports apps. Home Assistant Supervisor keeps it up to date, removing the need for you to manage an operating system. Home Assistant Operating System is the recommended installation type for most users., the system must meet the following conditions, or the restore doesn’t start:
- It’s connected to the internet.
- It has at least 2 GB of free storage after you upload the backup.
- You can’t check the free storage during onboarding. Instead, check how much storage your old system uses: On the old system, go to Settings > System > Repairs. From the three dots
menu, select System information. Under Home Assistant Supervisor, look at Disk used. - The storage of the new device must be larger than this value, plus at least 2 GB.
- You can’t check the free storage during onboarding. Instead, check how much storage your old system uses: On the old system, go to Settings > System > Repairs. From the three dots
- It’s healthy. To check, in your browser, go to
http://homeassistant.local:4357. The Observer opens, and under Health, it shows Healthy. - If the restore doesn’t start because of one of these conditions, refer to The restore is blocked from execution.
-
Required storage capacity: If you migrate the installation to a new device, make sure the new device has more storage capacity than the existing device.
- Before migrating, on the old system, check how much storage you used.
- Go to Settings > System > Repairs > … > System Information, and under Home Assistant Supervisor, look at the Disk used value.
- The target device must have more free space than the source device.
- If your target device is a Home Assistant Yellow, note that it is the size of the eMMC that is relevant.
- The restore process mainly uses the eMMC, not the NVMe.
- The size of the backup file is no indication of the size of your installation. To know the size of your installation, you need to check the Disk used value mentioned above.
- If you are migrating to a new device:
- You do not need to transfer the backup to a USB or SD card to bring it to your device.
- You will be able to upload the backup file from the device you are accessing the onboarding from.
To restore a backup during onboarding
- If you are migrating to a new device and you had controllers or radios connected (such as a Z-Wave stick or a Connect ZBT-2):
- make sure to plug them into the new device.
- Select the backup that you want to restore. It can be a backup file on your computer, or a backup stored on Home Assistant Cloud.
- To restore a backup file from your computer:
- On the welcome screen, select Upload backup.
- Select Select backup file.
- The file explorer opens on the device on which you are viewing the Home Assistant user interface.
- You can access any connected network drive from there.
- Select the backup file.
- To restore a backup from Home Assistant Cloud:
- On the welcome screen, select Home Assistant Cloud.
- Sign in to Home Assistant Cloud.
- To restore a backup file from your computer:
- In the dialog, select all the parts you want to restore.
- Your current system will be overwritten with the parts that you choose to restore.
- If you want to restore the complete configuration with all directories and apps, select everything.
- Enter the encryption key stored in the backup emergency kit of the system that created the backup.
- After the restore, new backups use the encryption key that is saved in the restored settings. Usually, that’s the key you entered. To be sure that you have the right key, download the emergency kit again after the restore.
- If the key isn’t accepted, refer to The encryption key isn’t accepted.
- To start the process, select Restore backup.
- The restore may take a while, depending on the amount of data.
- Don’t refresh the page. Just wait.
- If you refresh the page, you will see a “Not found” message. This is because the system is shutdown, wiped, and reinstalled from the backup. During that time, it won’t be reachable.
- If your previous installation had certificates enabled directly for the
httpintegration, when the restore is complete, it will no longer respond tohttp://requests. In this case, usehttps://(addeds) instead.
- On the login screen, enter the credentials of the system from which you took the backup.
- The login password and username must match the ones you used at the time the backup was taken.
- Your dashboard should show all the elements as they were when you created the backup.
- If some devices are shown as unavailable, you may need to wake the battery-powered devices.
- If you had network storage connected on the previous system, go to Settings > System > Storage and check that each network storage is listed and connected.
- If a share can’t be reached during the restore, its settings are still restored. Make sure that the share is available. Then, next to the network storage, select the reload
button. - If a network storage is missing, add it again. For the steps, refer to Add a new network storage.
- If a share can’t be reached during the restore, its settings are still restored. Make sure that the share is available. Then, next to the network storage, select the reload
- If you had Zigbee devices, and you migrated to a new device with its own Zigbee radio built-in:
- Because this is now a different Zigbee radio, you need to migrate Zigbee.
To restore a backup on your current system
On Home Assistant Operating SystemHome Assistant OS, the Home Assistant Operating System, is an embedded, minimalistic, operating system designed to run the Home Assistant ecosystem on single board computers (like the Raspberry Pi) or Virtual Machines. It includes Home Assistant Core, the Home Assistant Supervisor, and supports apps. Home Assistant Supervisor keeps it up to date, removing the need for you to manage an operating system. Home Assistant Operating System is the recommended installation type for most users., the restore only starts if the system meets the following conditions:
- It’s connected to the internet.
- It has at least 2 GB of free storage. To check, go to Settings > System. Under Storage, the description shows how much storage is free, for example,
35% used - 20.5 GB free. - It’s healthy. To check, go to Settings > System > Repairs. If no Unhealthy system - … repair is listed, the system is healthy.
If the restore doesn’t start because of one of these conditions, refer to The restore is blocked from execution.
- Go to Settings > System > Backups, and select Show all backups.
- To restore a backup file from your computer, first upload it: select the three dots
menu, select Upload backup, and then Select backup file. Select the file, and then select Upload backup.
- To restore a backup file from your computer, first upload it: select the three dots
- From the list of backups, select the backup from which you want to restore.
- Under Select what to restore, select the parts you want to restore:
- Your current system will be overwritten with the parts that you choose to restore.
- If you want to restore the complete configuration with all directories and apps, select everything.
- If you only want to restore specific elements, only select the folders and apps you want to restore.
- On Home Assistant Operating SystemHome Assistant OS, the Home Assistant Operating System, is an embedded, minimalistic, operating system designed to run the Home Assistant ecosystem on single board computers (like the Raspberry Pi) or Virtual Machines. It includes Home Assistant Core, the Home Assistant Supervisor, and supports apps. Home Assistant Supervisor keeps it up to date, removing the need for you to manage an operating system. Home Assistant Operating System is the recommended installation type for most users., the network storage from the backup is restored too. If this system already has a network storage with the same name, the one from the backup replaces it.
- Select Restore.
- Result: The Restore backup dialog opens.
- If the backup uses a different encryption key than the one on this system, enter that key.
- If you restore the Home Assistant settings, new backups use the encryption key that is saved in those settings. To be sure that you have the right key, download the emergency kit again after the restore.
- If the key isn’t accepted, refer to The encryption key isn’t accepted.
- To start the restore, select Restore.
- This may take a while, depending on how much there is to compress or decompress.
- Once the restore is complete, Home Assistant restarts to apply the new settings.
- You will lose the connection to the UI and it will return once the restart is completed.
- On the login screen, enter the password and username as they were at the time the backup was taken.
Troubleshooting backups
A backup fails and doesn’t show why
Symptom: “Last automatic backup failed” or “Failed to create backup”
An automatic or manual backup fails, and Home Assistant doesn’t say why.
Description
The reason is in the logs of Home Assistant. On Home Assistant Operating SystemHome Assistant OS, the Home Assistant Operating System, is an embedded, minimalistic, operating system designed to run the Home Assistant ecosystem on single board computers (like the Raspberry Pi) or Virtual Machines. It includes Home Assistant Core, the Home Assistant Supervisor, and supports apps. Home Assistant Supervisor keeps it up to date, removing the need for you to manage an operating system. Home Assistant Operating System is the recommended installation type for most users., the Supervisor creates the backup. The Home Assistant Core log then only shows a summary of the error. The details are in the Supervisor log.
Resolution
- Go to Settings > System > Logs.
- In Search logs, enter
backup.- Result: The list shows the backup errors. They start with
Error creating backup:and include the reason, such asCould not lock database within 30 seconds.
- Result: The list shows the backup errors. They start with
- On Home Assistant Operating SystemHome Assistant OS, the Home Assistant Operating System, is an embedded, minimalistic, operating system designed to run the Home Assistant ecosystem on single board computers (like the Raspberry Pi) or Virtual Machines. It includes Home Assistant Core, the Home Assistant Supervisor, and supports apps. Home Assistant Supervisor keeps it up to date, removing the need for you to manage an operating system. Home Assistant Operating System is the recommended installation type for most users., also check the Supervisor log. In the top-right corner, select Home Assistant Core > Supervisor. Then, in Search logs, enter
backupagain.- Result: The Supervisor log shows the details, for example, which app or folder couldn’t be backed up, and why.
- Find the reason in the problems below. If it isn’t listed, use it to search the community forum.
A backup fails with an I/O error or a read-only file system
Symptom: “[Errno 5] I/O error” or “[Errno 30] Read-only file system”
A backup fails, and the logs show [Errno 5] I/O error or [Errno 30] Read-only file system.
Description
The system can’t reliably read from or write to the storage that the backup is written to. This can be Home Assistant’s own storage, or a network storage that you use as a backup location.
If it’s Home Assistant’s own storage, a backup is often the first thing that fails, because it reads and writes many files. The same problem can also affect other parts of Home Assistant, such as recording history or saving settings.
Read-only file system means that the storage doesn’t accept any changes. On Home Assistant’s own storage, the system stops writing after a serious error, to protect the data on it. Until the system reboots, Home Assistant can’t save any changes. On a network storage, the share might be set to read-only.
This can be caused by one of the following problems:
- The storage device, such as an SD card or an SSD, is worn or failing.
- The connection to the storage is unstable, such as the USB cable or adapter of an external SSD.
- A network storage that you use as a backup location has a problem. For example, the share is read-only, or the connection dropped.
Resolution
First, find out which storage has the problem. If it’s Home Assistant’s own storage, make sure that you have a backup and its encryption key on another device. Then, find and fix the cause.
- If you use network storage as a backup location, check if the error is about it.
- Go to Settings > System > Logs, and in the top-right corner, select Home Assistant Core > Supervisor.
- Find the error. It includes the path of the file that couldn’t be read or written.
- If the path contains
mounts/followed by the name of your network storage, the problem is on the network storage. Check that the share is available, and that the user you entered in Home Assistant can write to it. The other steps don’t apply.
- Check if you have a recent backup on another location, such as Home Assistant Cloud or network storage.
- Go to Settings > System > Backups, and select Show all backups. The Locations column shows where each backup is stored.
- Backups on other locations aren’t affected by the storage problem. If you have a recent one, continue with step 6.
- If you can’t reach Home Assistant at all, use a backup from another location.
- If you don’t have a backup on another location, you can’t get your local backups through Home Assistant.
- To store future backups on other locations too, refer to Defining backup locations.
- If all your backups are stored locally, copy the most recent one to another device. Use one of the following ways:
- Download it from the backup page. This also works if Home Assistant only starts in recovery mode.
- On Home Assistant Operating SystemHome Assistant OS, the Home Assistant Operating System, is an embedded, minimalistic, operating system designed to run the Home Assistant ecosystem on single board computers (like the Raspberry Pi) or Virtual Machines. It includes Home Assistant Core, the Home Assistant Supervisor, and supports apps. Home Assistant Supervisor keeps it up to date, removing the need for you to manage an operating system. Home Assistant Operating System is the recommended installation type for most users., if the Samba share app is installed, copy it from the
backupfolder.
- If you can’t download or copy a backup, it might be damaged. Try an older one.
- Make sure that you have the encryption key for the backup you want to restore. The key is in the backup emergency kit.
- If you don’t have the emergency kit anymore, download it now: Go to Settings > System > Backups. On the Encryption key card, next to Download emergency kit, select Download.
- This emergency kit contains your current key. If you changed the key after you created the backup, you need the emergency kit from before the change. Home Assistant doesn’t have the old key anymore.
- The current key is also stored on the affected storage. If you replace the storage before you save the key, you can’t restore backups that use it.
- Reboot the system, and then create a new backup. Some errors, such as a read-only file system, can go away after a reboot.
- To reboot, refer to Rebooting the system.
- If the storage is connected over USB, such as an external SSD, shut down the system instead. Reconnect the cable, and then start the system again.
- If the error comes back and the storage is connected over USB, try another cable or adapter.
- On Home Assistant Operating SystemHome Assistant OS, the Home Assistant Operating System, is an embedded, minimalistic, operating system designed to run the Home Assistant ecosystem on single board computers (like the Raspberry Pi) or Virtual Machines. It includes Home Assistant Core, the Home Assistant Supervisor, and supports apps. Home Assistant Supervisor keeps it up to date, removing the need for you to manage an operating system. Home Assistant Operating System is the recommended installation type for most users., check how worn the storage device is. Go to Settings > System > Storage.
- On the Disk metrics card, Lifetime shows how much of the expected lifetime of the device is used. The device reports this as an estimate.
- A high value can explain the errors. A low value doesn’t rule out a failing device.
- Lifetime is only shown for NVMe SSDs and eMMC storage that report their wear level.
- If the errors continue, replace the storage device. Then, install Home Assistant on the new storage, and restore a backup during onboarding.
- If you replace an SD card on Home Assistant Operating SystemHome Assistant OS, the Home Assistant Operating System, is an embedded, minimalistic, operating system designed to run the Home Assistant ecosystem on single board computers (like the Raspberry Pi) or Virtual Machines. It includes Home Assistant Core, the Home Assistant Supervisor, and supports apps. Home Assistant Supervisor keeps it up to date, removing the need for you to manage an operating system. Home Assistant Operating System is the recommended installation type for most users., you can also move your data to an SSD. For the steps, refer to Using external data disk.
- If Home Assistant also shows the repair Unhealthy system - Operating System error: Bad message, refer to Operating System error: Bad message.
A backup fails because the database can’t be locked
Symptom: “Could not lock database within 30 seconds”
A backup fails, and the logs show Error during pre-backup: Could not lock database within 30 seconds.
Description
Before Home Assistant creates a backup, the Recorder stops writing to its database, so that the database in the backup is complete. The Recorder first finishes the work that it’s busy with. If that takes longer than 30 seconds, the backup fails.
This could be caused, for example, by one of the following situations:
- The Recorder does its maintenance. By default, it cleans up old data every night at 04:12, and repacks the database on the second Sunday of each month.
- The database is large, or Home Assistant writes a lot of data to it.
- The storage is slow. For example, you use a USB stick as the data disk. An SSD is much faster.
This only happens with the default SQLite database. If you use MariaDB or PostgreSQL, Home Assistant doesn’t lock the database, and this error doesn’t occur.
Resolution
- Wait a few minutes, and then create the backup again.
- If automatic backups fail, change when they run. The default, System optimal, starts between 04:45 and 05:45. That’s shortly after the Recorder maintenance at 04:12, and a long repack can still be running then.
- Go to Settings > System > Backups. On the Automatic backup card, select Configure backup settings.
- Under Backup cycle, set Time to Custom, and pick a time later in the day.
- Time is only shown when Schedule is set to Daily or Custom days.
- If backups keep failing, make the database smaller. For example, keep fewer days of history, or exclude entities that change often. For details, refer to Preparing for a backup.
A backup location is unavailable
Symptom: “The backup location … is unavailable”
Under Settings > System > Repairs, Home Assistant shows The backup location … is unavailable. The title shows the internal ID of the location, not its name.
Description
The location is still selected for automatic backups, but Home Assistant can’t use it. This happens when the integration that provides the location isn’t loaded. For example, you removed or disabled the integration, or it failed to start. Automatic backups skip this location until it’s available again.
The repair goes away when the location is available again, or when you remove it from the automatic backup settings.
Resolution
- If you still want to use the location, go to Settings > Devices & services, and check the integration that provides it.
- If the integration shows an error, fix it. For the steps, refer to the documentation of the integration.
- If you no longer use the location, remove it from the automatic backup settings:
- Go to Settings > System > Backups. On the Automatic backup card, select Configure backup settings.
- Under Locations > Unavailable locations, next to the location, select the delete
icon.
An automatic backup wasn’t uploaded to all locations
Symptom: “Automatic backup could not be uploaded to the configured locations”
Under Settings > System > Repairs, Home Assistant shows Automatic backup could not be uploaded to the configured locations. The repair lists the locations that failed.
Description
Home Assistant created the backup, but couldn’t store it on one or more of the selected locations. For example, the location was offline or full. The backup is still stored on the other locations.
Home Assistant only shows this repair for automatic backups. The repair goes away after the next automatic backup that completes without errors.
Resolution
- Find the reason in the logs. For the steps, refer to “Last automatic backup failed” or “Failed to create backup”.
- Fix the problem with the location. For example, free up space on it.
- To check the fix right away, create a manual backup on that location.
An automatic backup doesn’t include all apps
Symptom: “Not all apps could be included in automatic backup”
Under Settings > System > Repairs, Home Assistant shows Not all apps could be included in automatic backup. The repair lists the apps that failed.
Description
Home Assistant created the backup, but couldn’t back up one or more apps. The backup doesn’t contain these apps. The details page of the backup also shows them, under Failed apps.
Home Assistant only shows this repair for automatic backups. The repair goes away after the next automatic backup that completes without errors.
Resolution
- Go to Settings > System > Logs, and in the top-right corner, select Home Assistant Core > Supervisor.
- The log shows why the app couldn’t be backed up.
- Depending on the error in the log, do the following:
-
Failed running pre-/post backup command: The app’s own preparation for the backup failed. To see why, go to Settings > Apps, select the app, and open the Log tab. Restart the app, and then try again. -
Can't write backup tarfile for app: Home Assistant couldn’t add a file of the app to the backup. The end of the error names the file and the reason:-
I/O error: The storage couldn’t read the file. Refer to A backup fails with an I/O error or a read-only file system. -
No such file or directory: The file was removed while the backup ran. Create the backup again. -
Permission denied: Home Assistant isn’t allowed to read the file. This can happen with files that another app or tool created. Change the permissions of the file with the tool that created it. Only delete the file if you’re sure that nobody needs it anymore.
-
- For other errors, update the app or restart it, and then try again.
-
- To check the fix right away, create a manual backup.
An automatic backup doesn’t include all folders
Symptom: “Not all folders could be included in automatic backup”
Under Settings > System > Repairs, Home Assistant shows Not all folders could be included in automatic backup. The repair lists the folders that failed, such as media or share.
Description
Home Assistant created the backup, but couldn’t back up one or more folders. The backup doesn’t contain these folders. The details page of the backup also shows them, under Failed folders.
Home Assistant only shows this repair for automatic backups. The repair goes away after the next automatic backup that completes without errors.
Resolution
- Go to Settings > System > Logs, and in the top-right corner, select Home Assistant Core > Supervisor.
- The log shows why the folder couldn’t be backed up.
- Find the error that starts with
Can't backup folder. The end of the error names the file that couldn’t be added, and the reason:-
I/O error: The storage couldn’t read the file. Refer to A backup fails with an I/O error or a read-only file system. -
No such file or directory: The file was removed while the backup ran. Create the backup again. -
Permission denied: Home Assistant isn’t allowed to read the file. This can happen with files that another app or tool created. Change the permissions of the file with the tool that created it. Only delete the file if you’re sure that nobody needs it anymore.
-
- To check the fix right away, create a manual backup.
An automatic backup was created with errors
Symptom: “Automatic backup was created with errors”
Under Settings > System > Repairs, Home Assistant shows Automatic backup was created with errors. The repair lists the following:
- The locations the backup couldn’t be uploaded to
- The apps that couldn’t be backed up
- The folders that couldn’t be backed up
Description
Home Assistant created the backup, but more than one kind of problem occurred. For example, an app couldn’t be backed up, and the upload to a location failed. A dash (-) in the list means that there was no problem of that kind.
Home Assistant only shows this repair for automatic backups. The repair goes away after the next automatic backup that completes without errors.
Resolution
Fix each problem in the list:
- For locations, refer to An automatic backup wasn’t uploaded to all locations.
- For apps, refer to An automatic backup doesn’t include all apps.
- For folders, refer to An automatic backup doesn’t include all folders.
A backup says that some data is missing
Symptom: “This backup was not created successfully. Some data is missing.”
When you open a backup, its details page shows This backup was not created successfully. Some data is missing. Below it, the page lists Failed apps, Failed folders, or both.
Description
The backup was created, but some apps or folders couldn’t be backed up. The backup doesn’t contain them. The rest of the backup was stored as usual.
This applies to both automatic and manual backups.
Resolution
- Go to Settings > System > Logs, and in the top-right corner, select Home Assistant Core > Supervisor.
- The log shows why the apps or folders couldn’t be backed up.
- To find out what the error means and how to fix it, refer to one of the following entries:
- Create a new backup.
- Keep the backup with missing data until you have a complete backup.
A restore doesn’t start
Symptom: The restore is blocked from execution
You start a restore, but it doesn’t start. Home Assistant shows an error that contains blocked from execution. The error ends with one of the following reasons:
-
no supervisor internet connectionorno host internet connection not enough free space (…GB) left on the device-
system is not healthy, followed by the problems that were found
Description
On Home Assistant Operating SystemHome Assistant OS, the Home Assistant Operating System, is an embedded, minimalistic, operating system designed to run the Home Assistant ecosystem on single board computers (like the Raspberry Pi) or Virtual Machines. It includes Home Assistant Core, the Home Assistant Supervisor, and supports apps. Home Assistant Supervisor keeps it up to date, removing the need for you to manage an operating system. Home Assistant Operating System is the recommended installation type for most users., a restore only starts if the system meets all of the following conditions:
- It’s connected to the internet. Home Assistant checks this by contacting
checkonline.home-assistant.io. - It has at least 2 GB of free storage.
- It’s healthy.
This also applies to a restore during onboarding. A system without internet access, such as an offline setup, can’t start a restore.
Resolution
- If the error is about the internet connection, connect the system to the internet. Then, start the restore again.
- If a firewall or DNS filter blocks
checkonline.home-assistant.io, allow it for the restore.
- If a firewall or DNS filter blocks
- If the error is about free space, free up storage. Then, start the restore again.
- The error shows how much storage is free, for example,
not enough free space (1.2GB) left on the device. - To see how much storage is free and what uses it, refer to Viewing the available disk space.
- For ways to free up storage, such as deleting obsolete backups, refer to Clear up storage.
- An uploaded backup also uses storage. On a small storage device, a large backup can leave less than 2 GB free. In that case, use a larger storage device.
- The error shows how much storage is free, for example,
- If the error says the system isn’t healthy, fix each problem that the error lists. Then, start the restore again.
- The problems are listed after the dash. For example,
system is not healthy - dockerlists the problemdocker. - Each problem has its own page with the steps to fix it. To open the page, select the problem in one of the following places:
- If you’re signed in: in Settings > System > Repairs, where it’s listed as Unhealthy system - ….
- During onboarding: in the Observer, under Health. To open the Observer, in your browser, go to
http://homeassistant.local:4357. If this address doesn’t work, use the IP address of your system, for example,http://192.168.0.10:4357.
- The problems are listed after the dash. For example,
A restore seems stuck
Symptom: The restore seems stuck or shows “Not found”
A restore runs longer than you expect, and the page doesn’t change. When you reload the page, it shows Not found, or the page doesn’t load at all.
Description
During a restore, Home Assistant shuts down, and the system restores the backup in the background. Until it’s done, the Home Assistant UI isn’t reachable. That’s why the page shows Not found. The restore is still running. When the restore is done, Home Assistant starts again, and you see the login screen.
How long a restore takes depends on the size of the backup and on your hardware.
Resolution
- Don’t turn off or unplug the system. Leave the restore running.
- To check that the restore is still running, on Home Assistant Operating SystemHome Assistant OS, the Home Assistant Operating System, is an embedded, minimalistic, operating system designed to run the Home Assistant ecosystem on single board computers (like the Raspberry Pi) or Virtual Machines. It includes Home Assistant Core, the Home Assistant Supervisor, and supports apps. Home Assistant Supervisor keeps it up to date, removing the need for you to manage an operating system. Home Assistant Operating System is the recommended installation type for most users., open the Observer. In your browser, go to
http://homeassistant.local:4357.- If this address doesn’t work, use the IP address of your system, for example,
http://192.168.0.10:4357. - Result: The Observer shows the status of the Supervisor and, during the restore, its log.
- The Observer doesn’t update by itself. To see new lines in the log, reload the Observer page. Don’t reload the restore page.
- New lines in the log show that the restore is making progress. Some steps, such as restoring a large app, can take a while without new lines.
- If this address doesn’t work, use the IP address of your system, for example,
- If the log shows an error, the restore might have failed. If the error is about reading the backup file, such as
unexpected end of data, refer to A backup can’t be read. - For other errors, use the error to search the community forum. If you don’t find an answer, ask there.
A backup is damaged or incomplete
Symptom: A backup can’t be read
An upload fails, or the backup doesn’t show up after you upload it. Or, a restore or download fails. The logs show one of the following errors:
unexpected end of datafilename './backup.json' not foundInvalid password or corrupted backup.
To see the logs, go to Settings > System > Logs. On Home Assistant Operating SystemHome Assistant OS, the Home Assistant Operating System, is an embedded, minimalistic, operating system designed to run the Home Assistant ecosystem on single board computers (like the Raspberry Pi) or Virtual Machines. It includes Home Assistant Core, the Home Assistant Supervisor, and supports apps. Home Assistant Supervisor keeps it up to date, removing the need for you to manage an operating system. Home Assistant Operating System is the recommended installation type for most users., also check the Supervisor log: in the top-right corner, select Home Assistant Core > Supervisor.
A restore can also fail with The provided encryption key was incorrect, please try again., even if the key is correct.
Description
The errors mean the following:
-
unexpected end of data: The backup file is incomplete. For example, a download, upload, or copy stopped before it finished. -
filename './backup.json' not found: The file isn’t a Home Assistant backup, or its content was changed. For example, the file was unpacked and packed again. Every backup contains abackup.jsonfile that describes the backup. -
Invalid password or corrupted backup.: Home Assistant can’t decrypt the backup. Either the encryption key is wrong, or the file is damaged. Home Assistant can’t tell these two cases apart. That’s why a damaged backup can also show the message about an incorrect encryption key.
Resolution
- Check the encryption key. Use the key from the backup emergency kit of the system that created the backup.
- If you changed the encryption key after you created the backup, use the old key.
- Use another copy of the backup. For example, download it again from Home Assistant Cloud, or use the copy from your network storage or another backup location.
- If you copied the file yourself, copy it again. Then, check that the copy is the same size as the original.
- Upload the
.tarfile as it is. Don’t unpack it and pack it again. - If no copy of the backup works, the backup can’t be used. Use an older backup.
The encryption key isn’t accepted
Symptom: “The provided encryption key was incorrect”
When you restore a backup, Home Assistant shows The provided encryption key was incorrect, please try again.
Description
A backup can only be decrypted with the key that was used when the backup was created. Every Home Assistant system has its own key. The key isn’t accepted in one of the following situations:
- You entered the key of the system that you restore to, instead of the key of the system that created the backup. For example, a new installation has a key of its own.
- You changed the encryption key after the backup was created. The backup still uses the old key.
- You restored the Home Assistant settings from another backup after you downloaded the emergency kit. That also restored the encryption key that was saved in those settings, so backups made after the restore use that key.
- The backup was created with the Create a full backup or Create a partial backup action, and the action set its own Password. The backup then uses that password, not the key from the emergency kit.
- The backup is damaged. Home Assistant can’t tell a damaged backup from a wrong key.
Resolution
- Find the backup emergency kit of the system that created the backup.
- The emergency kit is a text file with a name like
home_assistant_backup_emergency_kit_<date>.txt. UnderInstance:, it shows the name of the system, and underDate:, when you downloaded it.
- The emergency kit is a text file with a name like
- If you changed the encryption key after you created the backup, use the emergency kit from before the change. When you changed the key, Home Assistant offered it as Download old emergency kit.
- Copy the key from the emergency kit and paste it. The key consists of seven groups of four characters, separated by hyphens. Include the hyphens.
- If an action created the backup with its own Password, enter that password instead. It doesn’t have the format of an emergency kit key.
- If the key still isn’t accepted, the backup might be damaged. Refer to A backup can’t be read.
- If you don’t have the key anymore, refer to I lost my backup encryption key.