Testing and troubleshooting automations
Sometimes an automation does not do what you expect. Maybe it does not run at all, maybe it runs at the wrong moment, or maybe one of the actions in the middle quietly fails. Home Assistant has built-in tools to help you find out exactly what happened, without having to dig through log files.
The most useful tool is the trace. Every time an automation runs, Home Assistant records a step-by-step timeline of what was triggered, which conditions were checked, and what each action did. You can also test parts of an automation directly from the editor, without waiting for a real trigger.
Testing your automation
Many automations can be tested directly in the automation editor UI.
Checking the state of a condition
You can see whether a condition passes or fails as soon as you add it to the automation.
In the automation editor UI, hover over the state indicator circle on the left side of the condition row to check the condition state. The available states are:
- Condition passes: the condition is verified.
- Condition did not pass: the condition is not verified.
- Invalid condition configuration: the condition has an invalid input value for an option, for example.
- Condition state unknown: the condition state can’t be checked due to a missing input value for an option, for example.
There is an automatic and continuous verification of the condition state. When you edit the condition and change any of its options, for example, the condition state is automatically updated.
Running the entire automation
In the three dots menu in the automation list or automation editor UI, select the Run actions button. This will execute all the actionsActions are used in several places in Home Assistant. As part of a script or automation, actions define what is going to happen once a trigger is activated. In scripts, an action is called sequence. [Learn more], while skipping all triggersA trigger is a set of values or conditions of a platform that are defined to cause an automation to run. [Learn more] and conditionsConditions are an optional part of an automation that will prevent an action from firing if they are not met. [Learn more]. This lets you test the full sequence of actions, as if the automation was triggered and all conditions were true. Note that any trigger ID used in your triggers will not be active when you test this way. The Trigger ID or any data passed by in the trigger data in conditions or actions can’t be tested directly this way.
You can also trigger an automation manually. This can test the conditions as if the automation was triggered by an event. Go to Settings > Developer tools > Actions. In the Action drop-down, select Automation: Trigger, then Choose entity to select the automation you are testing. Toggle whether to skip the conditions, then Perform action. If needed, additional trigger or other data can be added in the YAML view for testing. The trigger page has more information about data within the trigger.
If an event fires a trigger, the trigger row displays the message Triggered in the automation editor UI. You can select the message to see the YAML details in the Triggering event detail dialog.
Testing with complex triggers, conditions, and variables can be difficult. Note that using the Run actions button will skip all triggers and conditions, while Developer tools can be used with or without checking conditions.
Running individual actions or conditions
In the automation editor UI, each conditionConditions are an optional part of an automation that will prevent an action from firing if they are not met. [Learn more] can be tested individually. On the right side of the condition row, select the three dots
- Testing a condition will highlight it to show whether the condition passed at the moment it was tested. If all conditions pass, then the automation will run when triggered. Testing building blocks like an and condition will report whether the whole block registers as true or false, or you can test individual conditions within the building block.
- If the condition is verified, the condition row displays the message Condition passes.
- If the condition is not verified, the condition row displays the message Condition did not pass.
In the automation editor UI, each actionActions are used in several places in Home Assistant. As part of a script or automation, actions define what is going to happen once a trigger is activated. In scripts, an action is called sequence. [Learn more] can be tested individually. On the right side of the action row, select the three dots
- Testing an action block will run that block immediately.
- If the action runs, the action row displays the message Action ran successfully.
- If the action fails, the action row displays the message Error running action. Select the message to open a dialog with more information about the error.
Note that complex automations that depend on previous blocks, such as trigger IDs, variables in templates, or action calls that return data to use in subsequent blocks, cannot be tested this way.
If you are writing automations in YAML, it is also useful to go to Developer tools > YAML and in the Configuration validation section, select the Check configuration button. This is to make sure there are no syntax errors before restarting Home Assistant.
Traces
When an automationAutomations in Home Assistant allow you to automatically respond to things that happen in and around your home. [Learn more] is run, all steps are recorded and a trace is made. To open the automation editor, go to Settings > Automations & scenes.
From the automation editor UI, or in the automations list in the three dots menu, select Traces. Alternatively, select an automation entry shown under Activity.
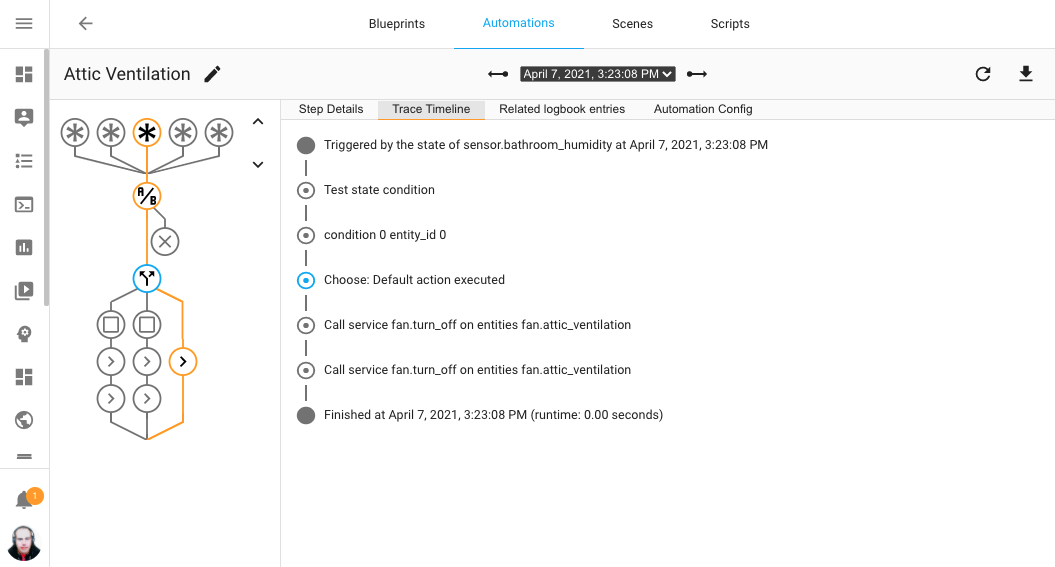
The above screenshot shows a previous run of an automation. The automation is displayed using an interactive graph, highlighting which path the automation took. Each node in the graph can be selected to view the details on what happened with the automation during that specific step. It traces the complete run of an automation.
The right side of the trace screen has tabs with more information:
- Step Details shows data and results of the step that is currently highlighted.
- Automation Config shows the full YAML configuration at the time the automation was run.
- Trace Timeline, shown in the screenshot above, lists the steps that were executed and their timing.
- Related activity, shows the activity for all the entries related to the specific trace.
- Blueprint Config will only be shown if the automation was created from a blueprintA blueprint is a script, automation, or template entity configuration with certain parts marked as configurable. This allows you to create multiple scripts, automations, or template entities based on the same blueprint, with each having its own configuration-specific settings. Blueprints are shared by the community on the blueprints exchange in the forum. [Learn more].
The top bar shows the date and time the automation was triggered. Use the left and right arrows to view previous runs of the automation.
Automations created in YAML must have an id assigned in order for debugging traces to be stored.
Trace configuration
The last 5 traces are recorded for all automations. It is possible to change this by adding the following code to your automation.
trace:
  stored_traces: 20
Testing templates
If your automation uses templates in any part, you can do the following to make sure it works as expected:
- Go to Settings > Developer tools > Template tab.
- Create all variables (sources) required for your template as described at the end of this paragraph.
- Copy your template code and paste it in Template editor straight after your variables.
- If necessary, change your sources’ value and check if the template works as you want and does not generate any errors.